Eyewitness Cook

Fancy-pants banana pudding

My Platonic ideal of this dessert is a little embarrassing, but this recipe restores my pride

  • more
    • All Share Services

Topics: , , ,

Fancy-pants banana puddingSmall dish of banana pudding with wafers and whip topping

Well, it’s pudding time over at the Salon Kitchen Challenge, and since I can’t enter my own contest, I thought I’d go ahead and give you my favorite pudding story and recipe here. Maybe it’ll get you excited enough to submit your own!

I love banana pudding more than you love your mother. If there’s some nearby, I will find it, and I will eat it.

But, truth be told, most of the time I won’t be very happy with it, mostly because it seems that everyone else in the world has this idea that banana pudding is supposed to be vanilla pudding with bananas cut up into it. Yes, yes, Nilla wafers and all that, but the thing is: I want my pudding to taste like banana, all the way through.

It’s a Platonic ideal thing. I didn’t grow up with pudding, of any sort, in my home. Then I went off to college, ate every day for two years in a dorm cafeteria (God, that really happened, didn’t it?), and it was there that I discovered my obsession, scooped by the ladle-full out of giant unbreakable bowls.

I worked in that cafeteria. The people who cooked there were all perfectly lovely (actually, they were salty as hell, tart-tongued women from Detroit, which is what made them so awesome), but I know for a fact that the puddings I fell for were made with banana-flavored powders and other unholy compounds.

So what am I to do? Must I make a choice between handmade puddings that don’t taste like banana at all and yellow dust from a box that sets without cooking?

Then, one day, like an angel’s sigh, an e-mail from my dear friend Sara Roahen landed in my inbox. She’d been working with the Southern Foodways Alliance to assemble a cookbook of members’ recipes, and she found one she thought I might be interested in: a pudding, rich with real milk and eggs and cream, that flavors the custard with banana caramel. Let me say that again: caramel you make with bananas. Pure genius.

It came from a bakery owner in New Orleans, Dana Logsden, and it had a story of its own:

John T. Edge received a last-minute cancellation at the SFA Symposium one year, and he asked me for a dessert contribution. I’d evacuated from New Orleans post-Katrina and was living in Baton Rouge. My housemates were complaining that I was getting them fat by baking too much. So the symposium was a perfect opportunity for me to bake for a crowd!

After throwing out several ideas, I half-heartedly mentioned banana pudding (which I had never made before). He stopped and said, “Banana pudding? I love banana pudding! What should we call the dish to make it sound fancy?”

Fancy-pants banana pudding
Adapted from Dana Logsden, who in turn adapted this from her Spiga Bakery banana caramel cream pie.

Serves 4, demurely (I have to limit myself). Double or triple recipe as needed.

BANANA CARAMEL

2 average to large bananas, very, very ripe (brown spots on skin)
1 cup granulated sugar
½ cup water
Special-ish equipment:
Blender or food processor
A heat-proof silicone spatula helps but isn’t necessary
Pastry brush, also useful but not necessary

  1. In a blender or food processor, puree the bananas fully, until they pour like pancake batter.
  2. Combine sugar and water in a very clean, heavy saucepan. Bring to a boil over high flame, and turn it down to a vigorous simmer. Try to avoid big bubbles splashing up too much onto the sides of the pot; those splashes can dry out, leaving the sugar to crystallize up there, and may cause your caramel to crystallize. (A very clean pot minimizes crystallization.) If you’re paranoid, keep a pastry brush soaking in water and brush the sides of the pot occasionally to wash the sugar back down. As the water boils off and you’re left with pure molten sugar, the bubbles will get bigger but slower and less violent. Nothing will look like it’s happening for a while, but keep an eye on it.
  3. When you start seeing some color develop at the bottom, gently swirl the pan to distribute it; this helps the sugar caramelize evenly. Caramel is a game of chicken: Pull the sugar off when it’s too lightly colored, and the flavor is one-dimensional. Pull it off when it’s too dark and it’s burnt, bitter and acrid. But once the color starts to turn, it turns pretty quickly, so you have to be brave but not stupid; only repetition and a good memory for color will tell you when you’ve got the perfect color. But if you’re new to this, play it a little safe and cook and swirl until the sugar is amber-colored and remove it from the heat, still swirling gently.
  4. A tip, from Emily Smith, of Chicago’s triple-cute Sweet Cakes Bakery: “To check the color, pull it from the heat and take it into a spot with some good light; this does two things: 1) cools it so you can see through to the bottom (stupid sugar bubbles!) and 2) that color is hard to see when the light over your stove is dim.” (She also adds, “We’re sorry that our website makes it look like we sell wholesale shoes. We’re working on it!”)
  5. If you were making a regular caramel sauce, this is where you would splash in cream, cooling the sugar and freezing the caramelization process. Or, if you wanted to do a liquor-flavored caramel, this is when you would hit it with booze, like whiskey or cider. In this version, we’re using the banana puree directly. Pour it in and stir vigorously with a spoon or heat-proof spatula, making sure to dig in the corners of the pan. It’ll hiss and sizzle and maybe even boil. Just stick with it and it’ll calm down. When it’s cooled, give it a taste. Delicious! You will have extra; keep it in the fridge.

PUDDING

1 ½ cups whole milk
½ cup heavy whipping cream, plus ½ to 1 cup more for whipping
3 tablespoons cornstarch
2 eggs
6 tablespoons sugar
¼ teaspoon salt
2 tablespoons unsalted butter, cut in pieces
¼ teaspoon vanilla extract
½ cup banana caramel (or to taste)
1-2 large, firm bananas (ripe, but still pale yellow)
Ginger snaps (or Nilla wafers, or cookie or cake of your choice)

  1. Reserve a couple tablespoons of milk. Combine the rest with the cream in a pan and bring to a boil over medium heat.
  2. While the dairy is heating, mix the reserved cold milk with the cornstarch in a heavy saucepan (at least 1.5 quart size) off heat. Make sure the starch dissolves; if you have floating bits of starch, smear them against the bottom of the pan with a rubber spatula or work them out with your fingers.
  3. Now whisk in the eggs and add the sugar and salt. Take a look at your milk. Is it boiling? Don’t let it boil over! (If it’s boiling, just take it off the heat while you’re getting the egg-starch-sugar mix ready.)
  4. In a slow, thin stream, pour the hot milk into the egg mixture while whisking. If you haven’t done this before, it’s called tempering, and the idea is to disperse the hot milk throughout the eggs, so one patch of them doesn’t take all the heat at once and scramble. Once you’ve tempered in about half the milk, go ahead and just pour and whisk in the rest.
  5. Set the pan over medium heat, and stir constantly and briskly, adding the butter piece by piece. If you have a heat-proof rubber spatula, I like to sweep the bottom of the pan in S-shaped strokes, making sure I cover the whole bottom so nothing sticks. Keep stirring until the mixture thickens. At some point it will look like melted ice cream. Then it will coat your spoon or spatula. And then it will look like … pudding! (Don’t freak out if some of it lumps up — just whisk it out.) Once it looks puddinglike, turn the heat down to low and just let it cook for a minute.
  6. Empty the pudding into a bowl. If you want to make sure it’s smooth, dump it in a fine-mesh strainer, and use your spatula to push it through. As Dana says, “I’m a baker, not a pastry chef. Sometimes my pudding gets lumpy. I just run it through a sieve.”
  7. Gently stir in the banana caramel (yes!) and the vanilla. (If you stir too much at this point, it will break down and get runny. Cornstarch is weird like that.) Press a sheet of plastic wrap directly onto the pudding surface to prevent a skin from forming, and let it cool completely before putting it in the fridge.
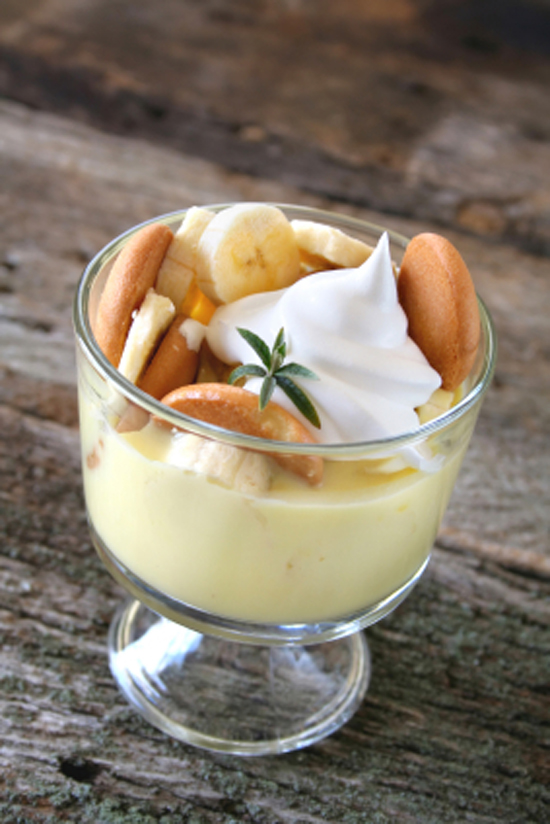
  8. To assemble and serve: This is your call. Some people like to do this, adorably, in individual jars, and others (read: my beloved cafeteria) will just pile it into a big unbreakable bowl. Either way, here’s the gist: Line the bottom and sides of whatever you’re serving in with crumbled cookies or cake. Cover halfway with a layer of pudding. Then add sliced bananas (you want them fairly firm so they don’t get mushy). Add a layer of cookies, another layer of bananas and another layer of pudding. Press plastic over the surface and refrigerate at least 4 hours. Before serving, cover with fresh whipped cream, and drizzle on some leftover banana caramel.
Continue Reading Close

Francis Lam is Features Editor at Gilt Taste, provides color commentary for the Cooking Channel show Food(ography), and tweets at @francis_lam.

A brilliant chef’s potato crisps

Michel Bras is a hero because he inspires me to look at simple food a new way. I hope I've done a bit of the same

  • more
    • All Share Services

Topics: ,

A brilliant chef's potato crisps

In my very first piece for Salon — if you don’t count our little Salon Food birth announcement — I wrote about discovering a hero in the chef Michel Bras. I’d never met him, never eaten his food. All I knew of him was from a movie, a decade-old documentary in which he sometimes struggles to articulate in words what it is that inspires him, but also in which he beautifully articulates his philosophy and character in the way he cooks — with respect, humility and curiosity. Watching him handle and hold the vegetables he’s cutting is a marvel; you’re watching a sense of wonder made physical.

I realize that sounds kind of laughable. But then again, how is it that a man whose signature dish is, essentially, a salad can be regarded as one of the greatest chefs in the world?

I think it’s because of his compelling sense of wonder, of his endless fascination with his ingredients — what they taste like, what they feel like, what they smell and look like. What he might be able to do with even the simplest food to make it seem new again, to reveal more of its character. I recently had the opportunity to watch him peel a carrot. (Yes, that sentence is for real, and the experience was spectacular.) He did this utterly pedestrian thing with such focus and care that when he’d cleared off all the peel and continued shaving into the carrot, beautiful, noodley ribbons curling onto his board, I could imagine the first time he did this, the first time he noticed this gorgeous shape, the first time he realized he could present carrots in a form so delicate and elegant.

So much of the soul of cooking is learning to open your eyes to the possibilities of anything in the kitchen. In my copy of his book “Essential Cuisine,” he wrote an inscription: “Nature speaks; experience translates.”

I’m thinking about this today because I hope that in my own, tiny, nongenius way, I’ve been able to help inspire your own cooking in this column. I’ve tried to share simple concepts and techniques to demystify new-to-you ingredients, or to make old ones taste new again. (For some reason, I also found it necessary to describe these “simple concepts” in 1,500-word columns. Sorry, I’m a yapper.) Whether it was to rediscover the aromatic pleasures of ginger and scallion by splashing them with sizzling oil, or to concentrate summer vegetables into a dense brick of pure flavor, to brulee and caramelize your Easter Peeps or to share the recipe for the greatest roast beef sandwich I have ever met, I hope you’ve enjoyed reading, talking and cooking with me.

If all this sounds a little bit like a soft-focus flashback montage sequence, it’s because, well, it is. Cue the waterworks: This is my last column for Salon.

What we’ve planned here is food coverage for curious people, for people who care about people, for people who are passionate about finding new ways to look at the world, whether they are “foodies” or people who think foodies’ main contribution to our society is allowing us to call wine dorks “winies.”

That’s what I said when I started, and I’m proud of the stories, essays and conversations we’ve shared here. For the last year and a half, I’ve had the pleasure and privilege of discussing the issues of food with you, big and small, from wondering about the ethnic politics of shark’s fin soup bans to the taste of things too horrible to enjoy in polite company. (Wait, this is going to turn into another montage sequence. Somebody stop me!)

It’s been a wild, educational, gratifying, infuriating, thrilling, humbling, exciting time. And so it’s with gratitude and sadness that I’m leaving Salon, but I won’t be going too terribly far. I hope to still contribute some meandering thoughts, and I’m excited by what’s coming up. I’ll be easy to find, on Twitter at <strong>@francis_lam, and on the web at about.me/francis_lam. I hope you’ll say hello!

But one more thing before I go — a recipe from Michel Bras. It’s for a long potato crisp, crackly and browned like the best chips, but with a softer, more mellow heart. In his truest spirit, they’re simple, delightful and just odd enough to get you wondering what else you might do with them … other than mow them all down before dinner’s served.

Michel Bras’ crispy potatoes

Adapted from “Essential Cuisine” by Michel Bras

Ingredients

  • Potatoes, starchy, like russets. About one medium-sized potato per baking sheet tray works.
  • Good olive oil or clarified butter, as needed
  • Salt, to taste

Directions

  1. Preheat oven to 275 F.
  2. Peel the potatoes and slice them lengthwise as thin as possible. I use a mandoline for this, one of those $20 Japanese babies, and cut them about 1 millimeter (a 25th of an inch) thin. In a pinch, you can improvise with a potato peeler; just use it to cut wide ribbons from the spud.
  3. Lay parchment paper or a Silpat (silicon baking sheet) on a baking tray. Brush it lightly with oil or clarified butter.
  4. Lay the potato slices in rows on the tray, overlapping the slices by about 1/3, to form long, shingled ribbons. Brush them lightly with oil or clarified butter.
  5. Bake, rotating after 20 minutes if your oven isn’t perfectly even, until the potatoes are a rich golden brown, crisp and translucent. Pale splotches are OK; in fact, they provide for an interesting textural contrast — a little less crisp, a little chewy. The only trick is to bake them long enough that the paler spots are cooked through and not rubbery, approaching crispness, about 45 minutes. When done, lightly salt them and let them cool a bit on the pan, and serve immediately or store in an airtight container. If they get a little stale, refresh them in a warm oven.
Continue Reading Close

Francis Lam is Features Editor at Gilt Taste, provides color commentary for the Cooking Channel show Food(ography), and tweets at @francis_lam.

Lemon icebox pie: A gift from the fates

I didn't deserve it, but the universe saw fit to send me this recipe for smooth, cold, lemony, creamy goodness

  • more
    • All Share Services

Topics: ,

Lemon icebox pie: A gift from the fates

There are some recipes you work for, that you earn — the ones you butter up a neighbor for, that you learn while getting hammered on the line at a restaurant. There are ones that are your cultural inheritance, and the ones that come through your bloodlines (which, depending on your family, might also mean that you suffered enough to deserve them). And then there are the ones that come to you like sweet destiny, like a flower borne in air, like a sudden, raunchy late-night call from someone you thought you’d never get to make out with again. You didn’t work for it, you might not even deserve it, but here it is and there you are.

Martha Foose’s Lemon Icebox Pie is that recipe for me.

Some time in 2008, when I was at the height of my Mississippi powers, living part-time on the Gulf coast and chatting up cooks and shrimpers and such, a group organizing a conference panel on culinary tourism asked me to come speak. Flattered and hubristic, I said yes. And only then did I proceed to ask myself, “What the hell do I know about promoting culinary tourism?”

The answer, of course, was, “Not a whole hell of a lot.” So I talked about it with my friend Google, jotted down some notes about magazine advertising rates or something, and showed up confident I could avoid sounding like I was just there for the free drinks at the reception.

I took my place at the panel, flashed a flirty smile at the (very beautiful, it turns out) woman who invited me, and heard the introductions of the other speakers. One was a culinary tourism promoter who’d been in the game for roughly three quarters of my life. The next was a woman who’d basically invented the term culinary tourism, who could tell you the name of every person to visit the great states of Louisiana, Mississippi, Arkansas, Florida and Montana from the years 1984-2007. And then there was me. With my notes. From a 20-minute round of Googling.

The rest is a little too painful to go over, but suffice it to say that I learned a few very important lessons that day:

  1. If you actually, literally ask the audience to laugh at your next joke, they will. But they will not actually be amused.
  2. Self-deprecating jokes from the stage are funny. Unless you’re bombing. Then they’re just depressing.
  3. No beautiful woman will be impressed with a flirty smile if you are obviously, appallingly incompetent.

Anyway, my time finally ground to an end, and I booked it out of that conference like my house was on fire.

On my way out, though, one of the organizers caught sight of me and, bless her heart, made sure I took home one of the thank-you gift bags. I wanted to protest. I wanted to give it back. I didn’t deserve it. I got home and opened it up, full of all manner of shameful reminders of my humiliation. I wanted to put them all out of my sight — the tumblers, the cooler bags, the aprons. But then I pulled out “Screen Doors and Sweet Tea,” Martha Foose’s cookbook.

A proud daughter of Mississippi, Martha left for a spell to train with some of the most renowned pastry chefs in France, and then returned home to cook, bake and teach up in the Mississippi Delta. I knew her from a random, wild-eyed moment years earlier, when I ran up to her after having a taste of her signature Sweet Tea Lemon Chess Pie, a pastry that will forever change the way you think about Mississippi, France, iced tea, pies, unicorns and ligers. I don’t even remember our conversation, but that there was some wary smiling and the word fraisage floated in the air (which is French for “smearing the crust dough in little circles and then stacking them all back on one another so it’s ridiculously flaky”), and I walked away hoping that I didn’t scare her too badly.

So then, in the comfort and social-awkwardness safety of my home, I opened the book to smashing success. The first page I opened to was banana pudding, which is as good a sign as there is in cookbooking. Four pages later, and I was in the promised land — “Lemon Icebox Pie: The Wonder of Sweetened Condensed Milk.”

I am a great lover of lemons, any food that includes the word “icebox,” and most of all, of the gooey ambrosia that is sweetened condensed milk. My feelings of shame and embarrassment gave way. I fired up the oven. I ground up graham crackers to make crumbs. And soon, spoon deep in its tart, creamy goodness, I started to thank fate for sending this recipe my way.

Martha Foose’s Lemon Icebox Pie

From “Screen Doors and Sweet Tea.” Used with permission, except for the stupid commentary, which is my own.

Makes one 9-inch pie

Ingredients

  • 1½ cups graham cracker crumbs (Whirl the graham crackers in a food processor for crumbs.)
  • ¼ cup granulated sugar
  • ½ teaspoon ground cinnamon (Cinnamon? In a lemon dessert? Yes. Just do it. You’ll thank Martha later.)
  • ½ cup (1 stick) unsalted butter, melted
  • 2 14-ounce cans sweetened condensed milk
  • 4 large egg yolks
  • 1 teaspoon grated lemon zest (I actually like a little more than this)
  • ½ cup fresh lemon juice (And I like a little more juice than this too, but taste it before baking and add to taste.)
  • 2 cups heavy cream
  • 6 tablespoons confectioners’ sugar

Directions

  1. Preheat the oven to 350 F.
  2. In a medium bowl, combine the crumbs, granulated sugar, cinnamon and melted butter. Pat into a 9-inch deep-dish pie pan and bake for 6 to 8 minutes, or until slightly browned. Remove to a wire rack to cool.
  3. Meanwhile, in a large bowl, whisk together the milk, yolks, lemon zest and lemon juice. Pour the lemon filling into the cooled crust. Bake for 10 minutes, or until set. Cool on a rack. Chill the pie for 30 minutes.
  4. When the pie is completely cooled, whip the cream with the confectioners’ sugar until stiff peaks form. Mound the whipped cream on top of the pie and chill for 1 hour. (The chilling together isn’t strictly necessary, but it does make the whipped cream bond to the pie in a sort of fabulous way.)
Continue Reading Close

Francis Lam is Features Editor at Gilt Taste, provides color commentary for the Cooking Channel show Food(ography), and tweets at @francis_lam.

Mussels: Your go-to sustainable seafood

They're cheap, they're tasty, they are actually good for the environment, and they're infinitely variable

  • more
    • All Share Services

Topics: , , ,

Mussels: Your go-to sustainable seafood

Sometimes, this is the kind of chatter you hear in a coffee shop in Fancy Brooklyn:

Man 1: “Well, how are we going to drive home the point that sustainable seafood is good? I think I should have, like, five to seven minutes to talk about it before we serve.”

Man 2: “You’re going to have to do all the talking while I cook. I have to focus on the food while I cook. Don’t let people bother me.”

Woman: “I think mussels. We have to do mussels. They’re responsibly farmed, and they carry around their own sauce. They’re perfect.”

Man 1: “OK, but will we serve wine too? Or is just the lecture and the food enough?”

Aren’t you sad you didn’t get an invitation to the World’s Most Sanctimonious Dinner Party? I am. I want to know what gets served for dessert at a soiree like this.

But my Fancy Brooklyner self-hatred aside, the lady had it right, for sure — mussels are the jam. They taste great, are cheap, are ridiculously easy to cook, still pack some heat on the impress-the-guests scale, are seriously versatile and are, yes, sustainable. Calling seafood “sustainable” is usually tricky business because there are so many variables, but with mussels, you’ll almost always get responsibly farmed shellfish that actually clean the water they’re grown in. (They’re a “best choice” on the well-respected Monterey Bay Aquarium Seafood Watch list.)

For too long relegated to “mixed-seafood pasta” jumbles or clichéd steams with white wine and herbs, it’s time for mussels to get shown a little love. They can seem intimidating for home cooks, but really, I can’t think of anything easier to prepare. And I love how sitting there with a big pot of them, slurping them out of the shell, soaking up the broth with bread, turns dinner into an event of conversation and juice-slicked hands.

How to clean mussels

Most mussels come pretty clean, actually, and there’s pretty much never a problem with grit or sand, as you might have with clams. If there’s a beard coming out of one — you’ll know it when you see it — just give it a yank to pull it off. Some chefs want you to scrub them afterwards with a stiff brush or pad, but I never do. Your call.

How to store mussels

You don’t want to hang on to them for too terribly long, more than a couple days, but they’re fine in the fridge. Especially if you keep them in a bowl lined and topped with a moistened towel or paper towel. Whatever you do, don’t keep them in water; fresh water will kill them.

How to cook mussels

Get them hot. They will open. They are cooked.

How to cook delicious mussels

OK, this is the fun part. Mussels have a flavor that’s unmistakably oceanic — salty, briny, minerally. They’re not as saline or meaty as clams, not as clear and ringing as oysters, but they’re a little earthier, a little down-and-dirtier. And they pair beautifully with anything you can think of that would do well with that salty, earthy bass note.

Earlier, I knocked on the combination of mussels with garlic and shallots, white wine, herbs and butter, but there’s a lot to be learned in the basics. You have garlic and shallots (and usually butter or olive oil) as the aromatic base; an acidic liquid to help the steaming and to lighten the flavor; a bunch of fresh herbs towards the end of cooking to add a nice top note, and a finishing stir-in of butter to enrich the broth.

Using this framework, you can start improvising your way to limitless combinations. Basically, if you can imagine a bunch of flavors tasting good together, they will probably be good with mussels. Like a version with leeks or onions (aromatics), bacon (just because) and dark beer (liquid), and finished with a stir-in of crushed or ground nuts for more richness. (And maybe a final splash of malt vinegar or something if it wants a little brightness.)

The handsome chef Barton Seaver (who once chipped the hell out of my cleaver when I was in culinary school with him, and no, that’s not a euphemism) has a new, excellently named book, “For Cod and Country,” and it’s got a bunch of fantastic mussel pairings: mustard in the classic white wine version, with scallions instead of herbs. Shallots, roasted until soft and caramelized, with red wine, finished with butter and rosemary. Roasted garlic and IPA or another strong beer, also finished with butter. A fistful of spices, finished with chorizo. (That one’s called Mussels Saint-Ex, and it’s probably worth buying the book for.)

Steamed mussels

This isn’t a recipe so much as a basic method for steaming mussels; please do improvise with different flavor combinations, liquids, finishers, etc. Serve with big hunks of bread, crisp toasts, French fries, rice, pasta or whatever floats your boat. Allow about 1 pound of mussels per person for a main course, or half that for an appetizer.

Ingredients

  • Aromatics, sliced or chopped, to taste (garlic, onion, shallots, ginger, lemongrass, chilies, bacon, salami, you name it. Just make sure it’s tasty stuff.)
  • ½ cup wine, beer, juice or whatever liquid you’d like (use more for a brothier dish, but the mussels themselves will release a lot of juice)
  • 2 pounds mussels, cleaned (see above)
  • Herbs, chopped (parsley, thyme, rosemary or others) or other delicate flavor additions, to taste (orange zest? A little more raw shallot?)
  • Butter, cream, olive oil, ground nuts or other finishing touch to enrich the broth, to taste
  • Lemon, vinegar or some other kind of tart flavoring, to taste, if your liquid isn’t very bright
  • Salt and pepper, to taste (mussels do tend to be salty, so this might not be necessary)

Directions

  1. Grab a pan big enough to fit all the mussels comfortably, preferably with a lid. Get it hot over medium heat. Add a touch of butter or oil, and sweat or sauté your aromatics. When they’re throwing off delicious smells, add the liquid and turn the heat up to high.
  2. When the liquid is boiling, add the mussels all at once, cover the pan, and give it a couple of good, hard shakes. Peek under the lid after about two minutes to see how they’re doing. Once they’re open, they’re cooked. Give the pan another shake, and another after two minutes or so, until all the shells are open. (If there are stubborn stragglers, way behind the rest, just ditch them. They might be dead, and you don’t want to overcook the rest of the mussels waiting for the dead to make contact.)
  3. Now have a taste of the broth. Season it with salt and pepper if need be, but here’s a tip — when you season, tip the pan and season directly into the broth, and stir it in to dissolve. (Just tossing salt into the pan might get a bunch of it tucked into the mussels’ shells, and you won’t be able to really tell how seasoned the broth is.)
  4. Add your herbs, butter and/or other finishers. Stir or toss to combine everything and emulsify the butter to a creamy sauce, and serve right away.
Continue Reading Close

Francis Lam is Features Editor at Gilt Taste, provides color commentary for the Cooking Channel show Food(ography), and tweets at @francis_lam.

How to brown butter, and bake it into brownies

A classic technique to get more flavor out of butter, good enough to be a sauce on its own. Or to amp up brownies

  • more
    • All Share Services

Topics: ,

How to brown butter, and bake it into brownies

Today, we’re going to talk about how to clarify and brown butter, but before we start, let’s take a look at what’s actually in butter. “Wait, what’s in butter? Isn’t butter just butter?” Pipe down, kids, we’re about to talk about it. And no one likes it when you shout your questions just to make yourself look smart, Stanley.

So: If you look on the nutrition facts label of standard unsalted butter, you’ll see that in one tablespoon (14 grams) of the stuff, there are 11 grams of fat. A little quick division, and you see that only about 73 percent of the butter is fat. (Actually, that’s not correct either, since butter legally has to be 80 percent fat or more, but accepted rounding in the math lets the label show less fat, so as not to scare consumers.)

Anyway, the point is this: There’s a lot in butter that’s not butterfat. The vast majority of that is water, and then there are milk solids, which are mainly sugars and proteins. Normally, all those elements are emulsified together, but you see them break apart when you heat it — ever notice how butter sizzles in a hot pan? That’s the water boiling furiously out of it. That foaming? That’s a mix of proteins trying to hold onto water that’s desperately trying to escape. And then, of course, there’s the browning.

Remember that the milk solids in butter are mainly sugars and proteins?

That’s the key. See, where there’s sugar, there can be caramelization. Where there’s protein, there can be meaty browning. Where there’re both of them, there can be THE BOMB.

Brown butter is a wonderful, wonderful thing. Evocatively called beurre noisette (hazelnut butter) in French, it gives God’s own grease a sweet, nutty flavor, turning in its smooth richness for one more liquid, dark and complex. It’s a classic “sauce” nearly on its own when splashed with a little lemon juice or vinegar to brighten it, maybe with some shallots and capers to bring it up even higher, or some chopped nuts to accentuate its fatty goodness. Herbs like parsley, thyme or rosemary get all happy in there, too, chopped and tossed in at the last second. Spoon some on sautéed chicken, fish or pork, and you’re in business.

But brown butter is one of those things that can turn on you in a second. It just gets more and more flavorful as it browns, until it hits some evilly magic point that turns it black, bitter and nasty. (There actually are uses for “buerre noir,” but I tend to leave that napalm alone.) So for beginners, it’s best to brown your butter slowly.

The safest way I’ve found to do it is this: Put a heavy, light-colored pan over medium heat. (Black-bottomed or nonstick pans make it hard to see the color.) Cut the butter into one-inch pieces, so that they melt and color evenly — you don’t want a big lump of butter still sliding around solid while stuff is already burning around it.

If you’re using just a small amount of butter, there’s really no mystery. Just let it get hot, foam and settle, and keep a close eye on the color of the milk solids at the bottom. Like caramel, the darker they are, the more complex the flavor, but the jump from dark to burnt is a shockingly quick one, so err on the side of safety. If you’re using this is as a sauce, add your lemon juice or capers or whatever else immediately, as it will help to cool it down and set the color.

But if you’re using a larger amount of Paula Deen’s best friend — as in the recipe below — you can work it a little more precisely. I like to use a lower heat, more medium to medium-low, to get a nice even color. As the water in the butter eventually comes to bubble up and boil, be careful — it has a tendency to splatter. Gently swirl the pan so that those bubbles dissipate a bit, and use a heatproof rubber spatula or spoon to clean up any early-browning bits along the side of the pan. (Don’t throw them out — just start adding them to whatever you’re going to put the butter on or in.) Stir often while cooking. Eventually, you’ll cook off the water, the milk solids will settle at the bottom, and the foamy proteins will look like a scum at the surface. You can skim it, if you’d like.

At this point, what you’re doing is clarifying the butter, and if you keep the heat pretty low, all the water will eventually evaporate without the milk solids browning. What you’ll be left with is crystal-clear pure butterfat. (It’s great for sautéing and high-heat cooking that you can’t normally do with butter.)

But let it keep going on the flame, and the solids will brown after a few minutes. Watch the pan. Once they turn a medium brown color, take them off; they’ll keep coloring from the residual heat.

The brownies below are from a recent issue of Bon Appetit magazine, and are fantastic. Instead of using chocolate, the recipe calls for cocoa, letting you use brown butter as the fat, which flavors them with that subtle, round nuttiness. I’ve modified the recipe to crank up that brown butter flavor, using the milk solids from twice the amount of butter — and you get to keep the extra!

Brown butter brownies

Modified from Alice Medrich, published in Bon Appetit, Feb. 2011

Makes 16 brownies

Ingredients

  • 2½ sticks of unsalted butter (Don’t freak out! You’ll only really use half of it.)
  • 1 cup sugar
  • ¾ cup unsweetened cocoa powder (you’d be amazed at how much difference there is in cocoa powders; get a good quality one)
  • ¼ teaspoon salt
  • 1 teaspoon vanilla extract
  • 2 teaspoons water
  • 2 large eggs, cold
  • 1/3 cup plus 1 tablespoon all-purpose flour
  • 1 cup walnuts, lightly toasted

Directions

  1. Preheat oven to 325 F.
  2. Line an 8×8-inch baking pan with aluminum foil, pressing it into the corners of the pan and leaving a couple inches of overhang. (You’re going to use this to lift the brownies out later. Genius! This is what you get for using recipes written by real professionals.) Rub a little butter over the foil to grease it.
  3. Melt and brown butter, as described above.
  4. While the butter is still in the early stages of cooking, combine the sugar, cocoa and salt in a fairly heatproof bowl.
  5. Have a second heatproof cup or bowl ready. When the milk solids are beautifully browned, either pour or scoop out ½ cup (8 tablespoons) of the butter into that cup, being careful to keep all the browned bits with you in the pan. Then all at once dump the butter from the pan into the bowl with the cocoa mixture. Scrape in all the browned bits stuck to the pan, unless they’re burnt. Add the vanilla and water, and stir to blend. It will come together like rough concrete. The mixture should be fairly hot; let cool for 5 minutes. (You get to keep the extra butter for other uses; store in fridge.)
  6. Beat in one of the eggs vigorously. It will look horrible. The butter will probably separate out of the cocoa/sugar mass, and it will start to make you very sad. About now, you will be cursing. Beat in the second egg, though, and watch it all come back together. Egg saves the day!
  7. When your mixture looks shiny and uniform, add the flour and stir until blended. The recipe continues: “Beat vigorously 60 strokes.” And seriously, they’re not kidding. As you work it, the gluten will develop in the flour and make it firmer and tougher. Just take a breath, hold on and crank it.
  8. Stir in the nuts, and scrape the batter into the baking pan. Bake 25 minutes, or until a toothpick in the center comes out not quite clean (there should be a few moist crumbs sticking to it). Cool the pan on a rack, then lift the brownies out with the foil. Cut into four strips, and quarter those to make 16 brownies.
Continue Reading Close

Francis Lam is Features Editor at Gilt Taste, provides color commentary for the Cooking Channel show Food(ography), and tweets at @francis_lam.

How to make cream-of-anything soup

Sure, here's a recipe. But you won't even need it to make rich-but-not-heavy soup. Don't submit to the can opener!

  • more
    • All Share Services

Topics: , ,

How to make cream-of-anything soupFresh asparagus soup in white plate close up(Credit: Dusan Zidar)

I know it’s embarrassingly old fashioned, but I’ve always loved “cream of” soups. And while we’re being honest, it’s never even really mattered too much to me what came after the “cream of,” because I’m really just in it for that floating, haunting richness, that deep savoriness, that smooth, velvety feeling on my tongue. If I end up getting some broccoli or asparagus or whatever in my system while I’m at it, well hey — winning!

But cream-ofs rarely get people excited anymore. Maybe it’s because they seem a little too Miss Daisy? Or because it’s hard to come back into the fold once you’ve opened a red-labeled can of the stuff and watched it fall, in gloopy chunks, into your casserole dish? Or maybe because every cafeteria has a tub of some poor, misbegotten cream-of sitting somewhere, hot and gluey, tasting like milk and flour and sadness?

Well, imagine for a minute a better place, a happy place, where cream-ofs are lively and vibrant, where they have real flavor and a texture that’s smooth and satisfying, not leaden and semisolid. That happy place is in your pot, and it’s easier than you might realize. You don’t really even need a recipe.

The key is knowing the procedure: You sweat some aromatics and the main ingredient (the part that comes after “of”) in a little butter or oil, sprinkle on just enough flour to pull it together, add some stock, simmer, puree it and finish with a shot of cream. The sweating brings out flavor, the flour mixes with the fat to form a quick, thickening roux, the simmering marries all the ingredients, pureeing smoothes and thickens, and the cream, well, the cream is the power move, of course.

Fundamental cream-of-anything soup

Adapted from “The Professional Chef,” 7th edition, Culinary Institute of America

Serves 4-6 as an appetizer (about 1 quart of soup)

Ingredients

  • 1 pound broccoli (or whatever — asparagus, mushrooms, celery, lettuce, cauliflower, chicken, carrot, peas, you get the picture), roughly chopped
  • ½ cup chopped onion (about 2 ounces, or ½ of a small onion)
  • 1 stalk celery, chopped
  • Aromatics of your choice — garlic, shallots, ginger, scallions, chilies etc.
  • 3 tablespoons butter or vegetable oil
  • 3 – 4 tablespoons flour
  • 2 cups (plus more as needed) chicken, vegetable, or other kind of stock
  • ¼ – ½ cup heavy cream
  • Salt and pepper to taste

Directions

  1. In a heavy pot over medium heat, sweat the broccoli (or whatever you’re using), the onions, celery and aromatics in the butter or oil. Stir frequently and don’t let it brown — turn down the heat if you have to — but cook them until the onions are translucent and soft, and the other vegetables are softening. Season with a little bit of salt and pepper.
  2. Sprinkle on three tablespoons of flour and stir thoroughly. You want the flour to start to pull all the vegetables together and turn them dull-looking, absorbing all their sheen. If they’re still kind of shiny with fat, sprinkle on the remaining flour — go by eye, and just use enough to make it look like there’s a matte coat on everything. Cook, stirring, until the flour starts to turn a light blond color, about 10 minutes. Congratulations, you just made a roux and sweated your vegetables at the same time. See? Told you this was easy.
  3. Slowly add the stock to the pot, stirring or whisking to make sure no lumps form in the roux. Once all the stock is in, bring it up to a boil over high heat, then turn down to a gentle simmer. Simmer at least 20 minutes, stirring every few minutes, until the vegetables are all quite soft and the soup appears thickened. (You want to simmer it at least 20 minutes to cook all the raw taste of the flour out.) If foam or scum floats to the top, just skim it off.
  4. When all the vegetables are soft, puree the soup in a blender, with an immersion blender, or if you’re old-school, in a food mill. (If you’re using a green vegetable as your main flavor ingredient and want some more color, feel free to add in some fresh parsley leaves to the simmering soup three minutes before pureeing — its color will brighten it back up a bit.)
  5. Put the soup back in the pot, add cream to taste and bring back up to a simmer. If it’s too thick, thin it with a little stock; too thin, add a little more cream or let it gently simmer to reduce. Taste, adjust seasoning with salt and pepper, garnish and serve.

How to garnish your soup: “Garnish” is the term of art, but I admit it sounds a little silly and froufrou. And, of course, garniture can be extraneous, but there’s a lot to be said for the added element of surprise, flavor, texture or visual appeal of a nicely garnished soup. So when deciding whether and how to garnish a soup, think of complementary or contrasting textures and flavors. Maybe a few crisp croutons or toasted nuts. Maybe an extra dollop of sour cream, or flavored whipped cream. Maybe a few bits of fried ham, chopped herbs or something as simple as bite-size pieces of the main ingredient, like extra broccoli florets quickly boiled tender-crisp and floating on top.

Continue Reading Close

Francis Lam is Features Editor at Gilt Taste, provides color commentary for the Cooking Channel show Food(ography), and tweets at @francis_lam.

Page 1 of 13 in Eyewitness Cook