This winning entry for the Salon Kitchen Challenge — in which we asked readers to create spicy and sweet dishes — comes to us courtesy of Linda Shiue. Check out this week’s Challenge here.
“You’re late,” she spat as she glared at me, and threw a chili pepper-decorated apron in my direction. “And if you had called me last night to confirm your arrival, as I had instructed you to, you would not have worn white.”
Not a promising start to my Oaxacan cooking class, which started the day after we arrived in the fabled Mexican city. But it wasn’t entirely my fault. I may not have called my instructor when we arrived the previous day (I thought the call was a courtesy, not a requirement), but I did do my duty as a conscientious student the evening before. Wanting to make sure I could make it to my class on time, I had located the restaurant where the class was to be held, and traced a route there from our hotel.
The next day, I arose early and left our lodging while my husband and toddlers were still sleeping. I strode off confidently towards the zocalo, a little nervous but really excited for the cooking class. Once I got there, everything looked different.
It wasn’t just the light, or the large crowd of people going about their daily routine and peddlers doing their business. Somehow, without knowing it, we had stumbled into what would end up being a seven month period of protests and violence, resulting in at least seventeen deaths, including that of an American journalist, Brad Will. At the time of our arrival, it had started simply as a local teachers’ strike. Over the next several months the teachers’ strike, which had been an annual event for a quarter decade, escalated exponentially, as other organizations joined in solidarity and reframed the protest into cries for resignation of the corrupt governor.
The zocalo was unrecognizable to me, with barricades set up, large placards being hoisted in the air, and tarps draped across streets, forming makeshift shelters for the ever increasing number of protestors. I didn’t know enough to be scared at the time, though. I was getting more anxious, realizing that I was going to be late for my class because I couldn’t find the landmarks I had memorized from the night before, and the sign for the restaurant, previously visible, was now covered by one of the tarps.
I also had the preconceived notion that the class might be run on “Mexican time.” Clearly not so.
The rest of my classmates, all other Americans, looked me up and down as I tried to make a space for myself in front of the counter. They had the confident look of students who had not only done their homework, but had read through the syllabus and even begun to write preliminary notes in the margins. I noticed that none of the others was wearing white. I felt self-conscious in my lacy, white cotton shirt, which felt so tropical and Latin to me, and quickly put on my chili-themed apron. (How conspicuous could I be?)
The good student that I am, though, I made up for lost time with my diligence and focus for the remainder of the day. I was enthusiastic as we learned about local ingredients and the fabled and almost mythical history of mole. I was an eager participant as we appreciated the scent of canela, seeded chilies, and juiced limons. As the recipes progressed in complexity from simple salsas, to a classic flan, and ultimately to the intensely aromatic and multifaceted mole rojo, my confidence grew. I raised my hand when volunteers were called up to assist the chef-instructor. We had a memorable feast, the fruits of our labor, and then set out for a stroll and to tour the local mercado. On our tour, I couldn’t resist showing off what I had learned as we looked at vainilla, chocolate, chipotles, and aguas frescas.
By the end of the afternoon, I think I redeemed myself. I even got a hint of a smile from the chef as we formally shook hands goodbye.
Thankfully, we were safe and our trip ended before the worst of the violence began. We were still able to view a lot of the beautiful Spanish colonial architecture of the old city and visit local workshops where the area’s famous handicrafts are made: fantastical alebrijes, earthy black pottery, hand-dyed and handwoven rugs. We visited local ruins. But we also saw landmarks defaced with graffiti, and were unable to visit the most legendary of ruins in the area, Monte Alban, due to a roadblock set up to stop a large assembly of protestors. It wasn’t until after we returned safely home, and I followed events in the news and in email dispatches from my cooking instructor, that I understood the extent of the situation. Because of the escalating danger that dragged on, my instructor eventually and very reluctantly closed her restaurant. There were no tourists, and therefore no business left anyway. She left her homeland, where her family had lived and cooked for generations, and moved with her family to Texas, where she has embarked in a different direction as a chef-instructor teaching Latin American cuisine at the Culinary Institute of America’s campus in San Antonio. With all that was going on, both in my awareness and under my radar, my memories of that trip are intense, both good and bad.
I have only fond memories, though, of the cooking class that started off like a Mexican telenovela spinoff of Gordon Ramsay’s “Hell’s Kitchen.” Despite my rocky beginning with the chili-tempered instructor, I left feeling so accomplished, having learned to make an excellent mole, which had previously seemed unreachable. Mole makes a romantic meal– rich and spicy, with a sweet, chocolatey depth– and requires enough steps to really prove your love.
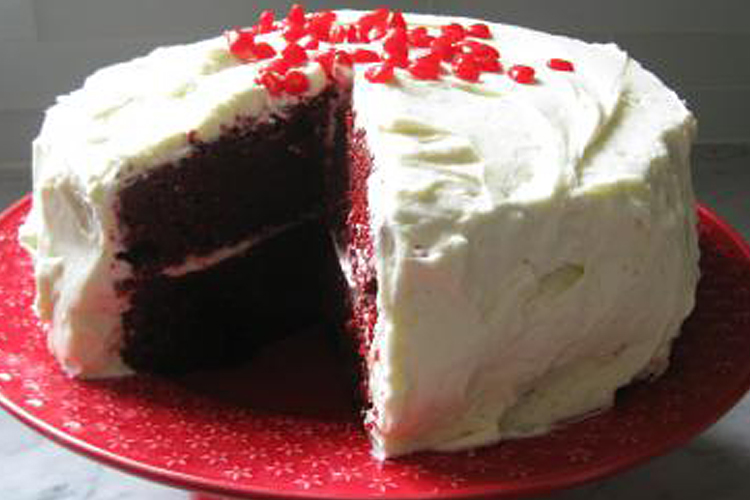
But I am already thinking ahead to dessert, a sweet conclusion to a fiery meal. Since it’s Valentine’s Day, why not make the dessert which looks most like what Cupid would serve: a red velvet cake. Tall crimson layers of moist chocolate cake slathered with unctuous folds of sensuously rich frosting, this cake is the picture of love. I’ve spiced it up with some chipotle, cayenne and cinnamon, to spark a little romance…
Red Hot Red Velvet Cake
Ingredients:
1 tablespoon unsalted butter
3½ cups cake flour
½ cup unsweetened cocoa (not Dutch process)
1½ teaspoons salt
1 teaspoon cinnamon
1 and 1/4 teaspoon ground chipotle chili powder
1/2 teaspoon cayenne pepper
2 cups canola oil
2¼ cups granulated sugar
3 large eggs
6 tablespoons (3 ounces) red food coloring
1½ teaspoons vanilla
1¼ cup buttermilk
2 teaspoons baking soda
2½ teaspoons white vinegar.
Cream cheese and marscapone frosting (recipe below)
Red Hots candy to garnish
1. Preheat oven to 350 degrees. Place teaspoon of butter in each of 3 round 9-inch layer cake pans and place pans in oven for a few minutes until butter melts. Remove pans from oven, brush interior bottom and sides of each with butter and line bottoms with parchment. Alternatively, place liners in three 12 portion cupcake pans.
2. Whisk cake flour, cocoa, salt and spices in a bowl.
3. Place oil and sugar in bowl of an electric mixer and beat at medium speed until well-blended. Beat in eggs one at a time. With machine on low, very slowly add red food coloring. (Take care: it may splash.) Add vanilla. Add flour mixture alternately with buttermilk in two batches. Scrape down bowl and beat just long enough to combine.
4. Place baking soda in a small dish, stir in vinegar and add to batter with machine running. Beat for 10 seconds.
5. Divide batter among pans, place in oven and bake until a cake tester comes out clean, 40 to 45 minutes. Let cool in pans 20 minutes. Then remove from pans, flip layers over and peel off parchment. Cool completely before frosting.
6. Frost cake layers or cupcakes generously, then top with Red Hots for your Valentine.
Cream Cheese and Marscapone Frosting
2 cups heavy cream, cold
12 ounces cream cheese, at room temperature
12 ounces mascarpone
½ teaspoon vanilla
1½ cups confectioners’ sugar, sifted.
1. Softly whip cream by hand, in electric mixer or in food processor. Cover in bowl and refrigerate.
2. Blend cream cheese and mascarpone in food processor or electric mixer until smooth. Add vanilla, pulse briefly, and add confectioners’ sugar. Blend well.
3. Transfer cream cheese mixture to bowl; fold in whipped cream. Refrigerate until needed.
Cake and frosting recipes adapted from The New York Times, Valentine’s Day, 2007.
The much-awaited monsoon rain showers are always a cause for celebration in India. When the rains finally arrived in Delhi, as a kid I remember rushing outdoors with my sisters, fully clothed, jumping for joy and singing out loud, trying to catch the first raindrops on our tongues. Kids here have songs to make the rain go away; we had chants to entice the clouds to shower more rain.
After the scorching heat of the dry summer and the almost daily onslaught of the dust-laden winds from the neighboring western desert, nothing was more welcome than the torrential downpour that signaled the start of the monsoon season. The dry, parched land soaked up the first raindrops eagerly, scenting the air with a heady, earthy aroma. Flowers bloomed again, adding to the fragrance. If you were lucky, you might be able to hear the call of the peacocks, and maybe even see a male unfurl the full splendor of its iridescent plumage, dancing in the rain for a mate.
Needless to say, we’d get soaking wet in no time at all. Eventually, we’d be coaxed inside with promises of pakoras, savory fritters made with a chickpea flour batter, and some ginger-cardamom chai. It takes great willpower to just have one or two pakoras; what usually starts off as a snack turns into a meal, ending with improvised sandwiches of bread slathered with mint-cilantro chutney and filled with the remaining pakoras. These fritters are not only good for a rainy day, but make a great snack any day, any time.
For lunch today, my family and I indulged in pakoras as we watched the liquid Oregon sunshine through the windows. With a hot cup of ginger chai tea, it was the perfect Sunday indulgence.
Here is a simple recipe to try. To make it easier, I’ve made many spices optional. No need to fret if you don’t have them all on hand. The chickpea flour is available in many ethnic stores.
Pakoras: Indian-style fritters
Serves 6-8
Ingredients
For the batter
- 1½ cups fine chickpea flour (also known as besan/garbanzo flour/gram flour; available at many Asian markets)
- Salt, to taste
- Cayenne pepper, to taste
- 1 teaspoon cumin powder
- 3-4 tablespoons finely chopped cilantro or parsley
- ½ cup to 1 cup of warm water
- A pinch of baking soda
- Optional spices, one or more of the following if used: a pinch of asafetida powder, ½ teaspoon turmeric powder, 2 teaspoon caraway seeds (ajwain) or 2 teaspoons nigella seeds (kalonji), 1 teaspoon dried pomegranate seed powder or 1 teaspoon dried unripe mango powder (amchoor)
For the fritters
- (Use any of the following, per your choice and availability)
- 1 medium potato, washed, scrubbed and cut into thin, round slices
- 1 or 2 Japanese eggplants, cut into wedges, or into round disks
- 1 cup of broccoli and cauliflower florets, cut into 1-to-2-inch pieces
- ½ block of store-bought paneer cheese, cut into small cubes or long pieces, about ½-inch thick
- 1 medium onion, peeled and cut into disks
- 1 small, thin zucchini squash, cut into ½-inch disks
- A handful of fresh spinach leaves
- 1 sweet pepper or a few hot peppers, cut into large chunks or round disks
- Peanut or vegetable oil, as needed, for frying
Directions
For the batter
- Place all the dry ingredients in a deep mixing bowl and stir well.
- Add the chopped cilantro and the optional spices. Slowly add ¼ cup of the warm water, mixing well with a fork or a whisk.
- Beat the batter to get a smooth consistency. Remove all lumps.
- Add additional water as needed to get the consistency you want. (Note: I make my batter very thin and runny, because I like a very light coating of batter on my fritters. If you are new to this, I suggest using less water and keeping your batter thick. A thick batter is easier to handle.)
- Whisk well for a few minutes, then let rest for at least 30 minutes while you prep the vegetables and heat the oil.
For the fritters
- Pour oil into the wok, saucepan or fryer. You need a depth of at least 1-2 inches, and several inches of clearance above the oil to be safe from bubbling over. Heat on low while you finish prepping the vegetables.
- Put the sliced potatoes and eggplant in a bowl of cold, salted water for 10-15 minutes. Drain and pat dry before frying.
- Salt the onion rings, mixing in the salt with your fingertips and set aside for 10-15 minutes. Pat dry before frying.
- When ready to start frying, turn the heat up and heat the oil to 350°F. To test if the oil is hot enough, you can also take a little batter on your fingertip and let it drop carefully into the oil. If it rises immediately, the oil is hot enough. Turn the heat down to a medium.
- Put a few of the vegetables into the batter and stir. Working with one piece at a time (I use one hand to do this, and the other hand to fry), coat well with the batter and carefully lower into the hot oil. If using spinach leaves, hold each leaf by the stem tip as you coat with batter.
- Fry on medium heat, turning a few times, till very light golden. Remove carefully from the hot oil and drain on absorbent paper towels.
- Repeat the process till all the vegetables and paneer cheese pieces are used up.
- When ready to serve, heat the oil again and fry the pakoras in batches a second time in hot oil till they are a golden brown all over. The second frying really crisps up the pakoras. Serve hot, with a sauce of your choice. I used a bit of mint-cilantro sauce stirred into some plain yogurt today.
Notes:
- Please use caution when frying and working with hot oil, taking care not to splash or drop the food from a height into the oil. Instead lower it in carefully, as close to the surface of the oil as possible.
- You may need to play with the temperature of the oil by turning the heat up or down a few times during the frying process. You want the fritters to bubble on contact with the oil, but not fry dark brown too quickly.
- To reheat, place in a single layer on a cookie sheet and bake in a preheated 350°F oven for 10 to 15 minutes. They will crisp up again very nicely.
- Any leftover batter will keep in the refrigerator for a few days.
Continue Reading
Close
The food of Rome is the gustatory reflection of a city whose history encompasses the glory of an empire and the squalor of a tiny provincial backwater, the excesses of Caligula and the holiness of saints, the refinement of court cuisine and the simple, earthy cookery of pilgrims and the poor. It’s almost shockingly powerful, almost primal, revolving around organ meats, garlic, black pepper, juniper berries, sausage, pork and cheese. Eating a Roman meal is like experiencing an earthquake or an orgasm or Mardi Gras.
In my mind, no dish better encapsulates the experience of Roman cuisine than Spaghetti alla Carbonara — the Roman charcoal industry’s gift to the world. As the story I’ve been told goes, the charcoal sellers lived in the towns in the hills of Lazio outside Rome, cutting wood and charring it before carrying it in sacks down to the city to sell. The work was almost unbearably physical, and demanded hearty food to keep up one’s energy — hence, the birth of this almost unbearably rich pasta dish.
How much of that is truth and how much the product of the Roman love for poetic fabrication I don’t know, but whatever its history, it’s my favorite meal on Earth, a marker of important events in the same way that others use champagne or cigars. When served, conversation around the table ceases, replaced by moans and grunting. It’s a pleasure too good to ever be called guilty.
A note on ingredients: I call for pancetta, an air-cured Italian pork belly that’s a cousin to bacon. I love its chewy sweet-saltiness, but most Romans would insist that you use guanciale, cured pork cheek, whose soft, buttery unctuousness produces a different texture and effect. Pancetta is widely available, usually presliced in thin sheet; I prefer to buy it from an artisan salumi producer that sells it in a cylindrical roll that allows me to cut it into small dice. Guanciale is less widely available. Both can be bought online from Boccalone, a San Francisco artisan salumeria, and in well-stocked Italian markets.
Also, this recipe uses minimally cooked eggs. All the usual caveats apply; I recommend sourcing eggs from responsible producers that are unlikely to have salmonella problems, but if you’re worried about uncooked eggs, this may not be the recipe for you.
Spaghetti alla Carbonara
*Mise en place is essential for this recipe. Have everything prepared before you start!
Ingredients
- 6 ounces pancetta or guanciale, cut into ¼-inch dice
- 1 tablespoon olive oil
- 2 whole eggs plus 3 egg yolks, beaten together with ¼ cup water
- ½ cup freshly grated pecorino romano (a hard, salty goat cheese)
- ½ cup freshly grated Parmigiano-Reggiano
- 1 teaspoon coarsely ground black pepper
- 1 pound good-quality spaghetti — splurge for the good stuff, and look for a rough, textured surface; the sauce will adhere better.
Directions
- Heat the oil in a high-sided skillet over medium heat and gently cook the pancetta/guanciale until the fat has fully rendered and the meat is just barely crisp but still chewy. Don’t fry it until it’s completely crisp! If the pancetta is done before the pasta, set it aside. DO NOT drain the rendered fat under any circumstances.
- Cook the pasta until al dente, reserving a small amount of the cooking water.
- Just before you drain the pasta, take a big sip of wine, and make sure you’ve got two pasta forks or other implements for tossing pasta quickly. If you took the pancetta off the heat early, put it back on the burner and heat it up so the fat is bubbling, then take it off the heat again and put it on a cutting board or other heatproof surface.
- Now, everything happens very fast; you’re relying on the latent heat of the pasta and pancetta to cook the sauce. Drain the pasta in a colander and dump it into the skillet at once, while it’s still hot; dump the cheese and pepper on top of that, and pour the beaten eggs over the whole mess — one, two, three, very fast! Then, immediately, toss that pasta like you’ve never tossed before. You want the eggs to mix with the cheese and coat the pasta smoothly, not hit the hot fat at the bottom and turn into globs of scrambled eggs. This is where I usually drop stuff and create lots of drama.
- Serve immediately, just as soon as the eggs set on the pasta, in warmed pasta bowls, passing extra cheese and pepper as desired — this recipe quickly congeals when cold, so scream “Mangia! Mangia!” at anybody inclined to linger over their salad. Sit back, drink wine, and enjoy the chorus of quiet, deeply moved profanity and moaning.
Quick Reference Steps:
- Sauté pancetta until just crisp but slightly chewy. Meanwhile, cook pasta until al dente.
- Heat up pancetta if taken off heat, drain pasta.
- Dump pasta, cheese, egg mixture, pepper into skillet and toss with hot pancetta.
- Serve immediately.
Continue Reading
Close
Cholesterol in the Lee clan has always been — as Homer Simpson famously said of alcohol — the cause of, and the solution to, all of life’s problems.
“You really shouldn’t eat so much fat,” Mom lectured one morning when I was visiting over Christmas. “That’s why your blood pressure so high.”
She told me this as I poured myself a bowl of granola and she prepared a breakfast of fried eggs and Spam for Dad.
We all know, of course, that food doesn’t have to be fattening to be wonderful. We love the custardy, string-free mangos that sometime pop up, for a mere 50 cents apiece, in Chinatown. We always look forward to the peppery salads made with the greens Mom grows in big pots on the back patio.
Still, some of the things nearest and dearest to our hearts and stomachs are not to be spoken of in the presence of respectable people — and the element of danger only increases their appeal. You’ll have to pry our pork belly sliders from our cold, dead (no doubt from congestive heart failure) hands.
Even Mom, the most vocal worrywart in the family, is not immune to the allure of fatty treats. Every so often over the years, she’d wax rhapsodic about the baroque, egg-laden Portuguese sweets she grew up with in Macau, which was at that time a Portuguese protectorate. I was intrigued by her descriptions of them and by the fact that none of these treats seemed to have a name, at least not that she could remember. One of these, she said, consisted of “tiny strands of egg yolk cooked in sugar, like a little birds’ nest”; another was “a ball of egg yolk that has crunchy sugar on the outside but is creamy when you bite into it”. How could these mysterious wonders not have names?
Later, my curiosity grew with the realization that I’d never seen anything resembling those confections anywhere — and I’ve been fortunate enough to live in places where one can track down just about any ethnic cuisine imaginable. Another reason for my fascination with those treats is that they are made almost entirely of egg yolks. Eggs in themselves, Mom liked to warn, should be eaten only in moderation. But the mystery sweets of her youth not only contained eggs, but only the bad, dangerous, cholesterol-bearing part of the egg, in lethal concentrations. And yet Mom liked to reminisce about those eggy sweets, and would no doubt eat one in a heartbeat if we somehow managed to conjure them up.
Then, last week, she called me, excited by a recent discovery. While browsing an online store featuring Spanish imports, she came across something that looked strikingly familiar — tiny, round convent sweets made of egg yolks, an artisanal specialty made for hundreds of years by an order of Spanish nuns in the walled medieval town of Avila. The description said they were crunchy with sugar on the outside with insides that dissolved on the tongue “without any pressure.”
Bingo. Or as close to “bingo” as we could hope to get: Spain and Portugal are neighboring countries with many shared food traditions, including an obsession with cramming as many egg yolks as possible into the dessert course. (There is a practical historical reason for this: Wine-makers in both countries required large quantities of egg whites to clarify wine, and the nuns used egg whites to starch their habits; hence, a steady supply of egg yolks was ready and waiting to be made into convent sweets.) The resulting cholesterol bombs became so beloved they spread around the world with the Spanish and Portuguese diaspora, evolving as they traveled. Local variants of Iberian egg sweets can be found in locales as far flung as the Philippines, Brazil — and Macau.
And Mom swore those pricey Spanish sweets from that online catalogue looked and sounded exactly like the ones she remembered from Macau. But no way was she going to pay to have those things airlifted in an insulated box from Spain to Los Angeles.
But, she said hopefully, there were recipes for it online, and they sounded pretty simple. I had myself a project.
The recipes I found for this confection, officially called yemas de Santa Teresa (literally “Saint Teresa’s egg yolks,” aka “the cause of, and solution to, all of life’s problems”), all take the same basic form: make a sugar syrup, mix it with an appalling number of egg yolks, cool the resulting mixture, form it into little balls, then roll the balls in sugar. Some recipes boast only three ingredients: egg yolks, sugar and water. Others enhance the syrup with lemon zest and/or cinnamon. I like the idea of a hit of spice and citrus to offset all that sweetness and richness; it adds to the mysterious medieval vibe of the confections and makes them feel both more and less pointlessly decadent.
I’ve always hated the term “sinful” when applied to food. It seems to reflect the worst aspects of Puritanism (free will and the Puritan work ethic I can get behind; the idea that life must be miserable to be virtuous, not so much). Besides, how could these little treats be sinful? They were invented by nuns. And sold by nuns to support their work. Ergo, those who eat them are doing God’s work.
Given these truths, how could they possibly be bad for you?
The following recipe is a combination of several nearly identical recipes I found online from different sources. Almost all of the credible-looking recipes came from websites based in Spain, which made me glad to have functional Spanish reading skills and a digital scale that allows metric measurements. I’ve converted the measurements to standard American measures.
YEMAS DE SANTA TERESA
Ingredients
- 8 egg yolks
- ½ cup sugar
- 1/3 cup plus 2 teaspoons water
- ½ stick cinnamon
- zest of 2/3 lemon
- Additional sugar for coating
Directions
- Beat the egg yolks, then pass them through a fine-meshed strainer into a heat-proof bowl.
- Combine the remaining ingredients in a small, heavy saucepan. Bring to a boil over medium heat and cook until the syrup reaches the soft-ball stage (There are two easy ways to tell: If you use a candy thermometer, this stage is between 235 and 240 degrees F. The low-tech way to test for readiness is to drop a small amount of the syrup into a bowl of ice water. If the syrup is ready, it will form a soft little ball that you can easily pick up and press flat between your fingers; if it’s not ready yet, it will dissolve in the water).
- Remove the cinnamon stick and lemon zest from the syrup, then gradually whisk the syrup into the egg yolks.
- Return the syrup and egg mixture to the saucepan. Cook over medium heat, whisking constantly, until the mixture thickens and starts to pull away from the sides of the pan.
- Put the mixture in a clean container and refrigerate until firm.
- Roll the cooled mixture into walnut-size balls and roll the balls in sugar.
- If you want to be fancy, put the balls in frilly little paper cups for serving.
Continue Reading
Close
What would be your last wish on your final morning in Hawaii? Catch the sunrise? A last-minute dip into the Pacific? Or perhaps one last exploration of tide pools, looking for crabs, starfish and sea turtles?
After a glorious week in the sun, while the rest of us were still asleep to the hypnotic sounds of waves, the breeze gently blowing through palm trees, and the lazy whir of the ceiling fan, my husband woke up quietly to sneak out for his one last wish. He drove 45 minutes (each way) to get a dozen malasadas. That’s the kind of guy he is.
Malasadas are the yeasty, eggy, sugary doughnuts that were introduced to the Hawaiian islands by Portuguese immigrants from the Azores generations ago. Eagerly incorporated into the cuisine of the Hawaiian islands, each island has a “best” place to get them. On the Big Island, that place is Tex Drive In, in Honokaa, near Waimea.
To the casual observer, the malasada looks like a typical raised doughnut, rolled in granulated sugar. Stace, one of the kama’aina (locals) I talked to, shed some light on what makes Tex’s malasada special: the first owners converted their recipe for pao doce (Portuguese sweet bread) and used it to make their mouth-watering and award-winning malasadas.
My husband arrived back with the box of malasadas just as the rest of us were waking up, and we quickly devoured them. That’s how you can eat on vacation — without consequences.
Back home, I wanted to make a Sunday brunch to remind us of Hawaii, which we miss too much already, but I don’t do much deep-frying in my kitchen. Thinking back to Stace, Tex’s malasadas, and the Portuguese immigrants who brought their sweet bread and malasadas to another heavenly island home, I made a not-too-guilty replacement: Portuguese sweet bread French toast with coconut syrup.
Portuguese-Hawaiian sweet bread French toast with coconut syrup
Sweet bread makes excellent French toast because of its eggy, light and slightly chewy texture. I made this version with guava- and taro-flavored sweet bread we brought back with us from Punalu’u Bake Shop, which by being located 30 minutes South of Hawaii Volcanoes National Park in Na’alehu is known as the “Southernmost Bakery in the U.S.A.” King’s Hawaiian bread or rolls, readily available in all major grocers on the mainland, make a great substitution. Hawaiian coconut syrup is more difficult to come by, so I’ve made a recipe you can make from ingredients easily found anywhere.
Ingredients
For coconut syrup
- 1 can (13- or 14-ounce) unsweetened coconut milk
- 1 cup simple syrup (made of equal amounts of granulated white sugar and water, boiled together)
- pinch of salt
For French toast
- 1 pound loaf of Hawaiian sweet bread (or rolls), such as King’s Hawaiian
- 5 large eggs
- ¼ cup milk
- 1 teaspoon vanilla extract
- ½ teaspoon ground cinnamon
- zest of a lemon, lime or tangerine
- butter, as needed for griddle or pan
Directions
For coconut syrup
- Whisk together coconut milk, simple syrup and salt in a saucepan, and bring to a gentle boil over medium heat. Stir occasionally to prevent scorching.
- The syrup is ready when boiled, but you can reduce to desired thickness by continuing to cook over low heat, stirring frequently.
For French toast
- Slice sweet bread into desired size slices.
- Whisk together eggs, milk and seasonings.
- Heat griddle or pan to medium-high and grease with a small amount of butter.
- Dip slices of sweet bread into egg mixture, then cook on griddle for a minute or so on each side, until nicely golden.
- Serve with coconut syrup and a dusting of powdered sugar.
Continue Reading
Close