In Absolute Best Tests, our writer Ella Quittner destroys the sanctity of her home kitchen in the name of the truth. She’s seared more porterhouse steaks than she cares to recall, tasted enough types of bacon to concern a cardiologist, and ranked potatoes from “most forgettable” to “potatoes we’d like to marry.” Today, she tackles shrimp.
Humankind’s first known shellfish feast occurred sometime around 163,000 B.C., in a cave on the southern coast of South Africa. Many millennia later, excavators found a bowl of roughly two dozen edible creatures, including mussels and at least one barnacle that had previously resided on the belly of a whale.
Humankind’s most bizarre known shellfish feast occurred sometime around 7 a.m. last Tuesday in my apartment. It consisted of just me, a whole pound of butter, and more shrimp than would comfortably fit in my crisper drawer. I emerged several hours later, grease-battered, weary, and surprised by several of my findings. It was, in other words, an average Absolute Best Tests trial day.
Let’s make like a crustacean and dive in:
Controls
I stripped out as much accoutrement and seasoning from the recipes as I could, but left basics like oil, butter, lemon, salt, red pepper flakes, cayenne, and garlic. I used differently sized shrimp — sometimes with the shell or head still affixed, sometimes peeled — depending on what best suited the method. My salt of choice is Diamond Crystal.
A quick note on shrimp versus prawn terminology: In her book “What’s the Difference?,” Brette Warshaw explains, “Anyone who tries to tell you that shrimp and prawns taste different is wrong.” That said, Warshaw details the differences between the two shellfish, noting that, “Both shrimp and prawns are decapods, which mean they have external skeletons and ten legs. Prawns live in fresh water, while shrimp can come from either fresh water or salt water. Generally speaking, prawns are larger than shrimp — though this depends on the species.” All of the methods below can be used with either prawns or shrimp.
Methods and Findings
Sear
Adapted from Food52.
- 1 pound large shrimp, deveined, shell on
- Finely grated zest of 1/2 lemon
- 1/2 teaspoon kosher salt
- 1/8 teaspoon cayenne pepper
- 1/4 cup unsalted butter, cut into tablespoons
- 4 garlic cloves, minced
- 3 tablespoons freshly squeezed lemon juice
- In a bowl, toss the shrimp with the lemon zest, salt, and cayenne until it’s coated well.
- In a large frying pan or wok, heat 3 tablespoons of butter over medium-high heat. Once the butter is foaming, add the garlic and lemon juice. Sauté for about 2 to 3 minutes, until the garlic has softened.
- Add the shrimp. Sauté until they cook through and turn pink, about 3 minutes. Take the pan off the heat and stir in the remaining butter.
I tested this method with both shell-on and peeled shrimp. The latter was fine, with shrimp that were less tender than some of the slower-cook methods like roast. But the shell-on test produced buttery, juicy shrimp that stole the show (the show being me, barefoot, eating shrimp in the morning). I suspect that the extra layer kept the shrimp from drying out as quickly when cooked over high heat. The shell also trapped the lemon, fat, and seasoning, which lent the meat more hearty, deeper-seated flavor than the peeled batch.
Pros: Efficient, moderately delicious.
Cons: Less tender when the shrimp are pre-peeled.
Roast
Adapted from Food52.
- 1 pound medium shrimp, peeled and deveined
- 1/2 teaspoon kosher salt
- 4 garlic cloves, grated
- 2 tablespoons extra-virgin olive oil
- 1/2 teaspoon red pepper flakes
- 1 lemon, zested and juiced
- 2 tablespoons unsalted butter
- Heat the oven to 450°F.
- On a half sheet pan, toss the shrimp, salt, garlic, olive oil, red pepper flakes, and lemon zest. Let sit for 10 minutes.
- Roast for 7 to 9 minutes, until pink and just cooked through. Remove from the oven, add the butter, and toss the shrimp until coated. Spritz with fresh lemon juice.
Roasting the shrimp for 8-ish minutes at a consistent temperature — instead of blasting them with high heat in a pan — produced meat that was sweeter and softer than the sear batch. The real standout, though, was the garlic, which began to caramelize into sticky, savory bits on each individual shrimp. I ate a whole half-batch myself before 8 a.m. Over rice, with a drizzle of soy and tart vinegar, they could overthrow any other entrée.
Pros: So, so, so good.
Cons: Took twice as long as the sear and broil methods.
Fry
Adapted from Grandbaby Cakes.
- 2/3 cup all-purpose flour
- 1/3 cup yellow cornmeal
- 2 teaspoons kosher or seasoned salt
- 3/4 teaspoon ground cayenne
- 1/2 cup buttermilk
- 1 large egg
- 2 teaspoons hot sauce (I used Tabasco)
- 1 pound medium shrimp, peeled and deveined
- Neutral oil (such as vegetable)
- Lemon wedges
- In a brown bag or ziplock bag, shake together the flour, cornmeal, salt, and cayenne.
- In a shallow bowl, whisk together the buttermilk, egg, and hot sauce. Take each piece of shrimp and dip it in the wet mixture, then add it to the bag with the flour mixture. Once half of the shrimp are in the bag, seal and shake to coat each piece well. Place the coated shrimp on a baking sheet and repeat with the rest.
- While the coating sets, add 2 to 2 1/2 inches of oil to a deep pot and heat over medium-high heat. Fry the shrimp until golden and curled into a C shape, a couple minutes. Be careful not to overcook — you can always cut into a piece to check whether it’s cooked through. Drain on paper towels.
- Serve with lemon wedges for squeezing on top.
The breaded and fried shrimp were an unqualified success. The breading was crispy and gently sweet, and provided a spicy swaddle for super-succulent meat. This method would work for any size shrimp, which I feel compelled to mention in case you’d like to invite me over and feed me a vat of popcorn bay shrimp!
Pros: Flavorful, crispy, ideal.
Cons: More steps than some of the simpler methods, but what else do you have to do???
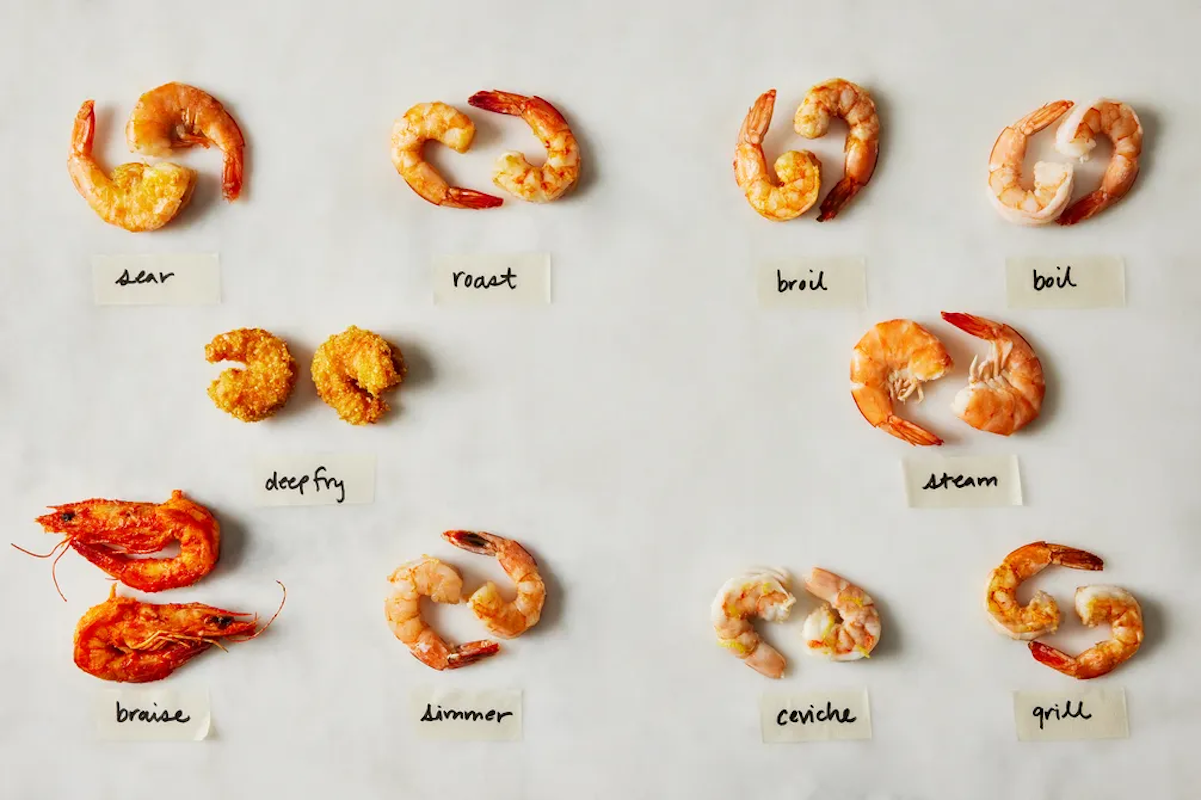
/f36695f0-ff52-4019-9ef3-79d8a83d8410--2021-1203_how-to-cook-shrimp_4x5_mj-kroeger-1.jpg)
Photo by MJ Kroeger. Prop stylist: Molly Fitzsimons. Food stylistL Lauren Lapenna.
Braise
Adapted from Food52.
- Extra-virgin olive oil
- 1 large yellow onion, diced
- 1 red bell pepper, diced
- Kosher salt
- 2 bird’s-eye chiles, halved and seeded
- 2 garlic cloves, peeled
- Zest of 1 lemon
- 1 pound large head-on shrimp, deveined, shell on
- Juice of 1 lemon
- Set a large skillet or wok over medium heat. Add a thin layer of oil. Add the onion and bell pepper. Season with salt and sauté until translucent and beginning to brown. Add the chiles and cook for an additional 2 minutes, until tender.
- Transfer the contents of the skillet to a blender. Add the garlic and lemon zest. Add 3 tablespoons of oil and blend until smooth, stopping to scrape down the sides of the blender with a rubber spatula as needed. If the sauce looks too thick, you can add 1 tablespoon of water at a time until you reach a saucy consistency.
- Set a large skillet over high heat and add a thin layer of oil. When the oil is glistening and just about to start smoking, add the shrimp. Season with salt and let the shrimp cook undisturbed for about 1 minute, until the bottom of each shrimp is bright pink and browned. Flip. Keep cooking until the other side is crispy and browned. Reduce the heat to low and add the sauce to the skillet. Simmer until the shrimp are fully cooked through, another few minutes. Remove from the heat and add the lemon juice. Stir the sauce and then taste it. Adjust with salt as necessary.
Everything about this braise method was delightful. I drank some of the sauce straight from my blender and shouted “holy hell!” into the void (my empty apartment). The resulting shrimp was deeply flavored. The original recipe calls for peeled shrimp (with the head still on), but after trying it both ways, I found the shell-on, head-on shrimp retained much more flavor and moisture.
Pros: An entire dish as is, and a killer one at that. Are people still saying killer? My only friends are shrimp.
Cons: If, like me, you cook in a New York City kitchen, you have to do the horrible dance of taking out your blender or food processor.
Simmer
Adapted from The New York Times.
- 1/4 cup unsalted butter
- 2 tablespoons extra-virgin olive oil
- 4 garlic cloves, minced
- 1/3 cup dry white wine
- 3/4 teaspoon kosher salt, or to taste
- 1/8 teaspoon crushed red pepper flakes, or to taste
- 3/4 pound large shrimp, shelled and deveined
- Freshly squeezed juice of half a lemon
- In a large skillet, melt the butter together with the olive oil. Add the garlic. Sauté until fragrant, about 1 minute.
- Add the wine, salt, and red pepper flakes and bring to a simmer. Let the wine reduce by half, about 2 minutes.
- Add the shrimp and sauté just until they turn pink, 2 to 4 minutes, depending upon their size. Stir in the lemon juice.
The scampied shrimp were the most tender of the stovetop batches (sear, boil), with the exception of the braise. Each bite proffered so much buttery, acidic broth, I began to forget what I was tasting for, and instead started pawing blindly around my kitchen for a hunk of crusty bread until my hand landed on a hot kettle and I had to call it quits. Is that a good thing, or a bad thing? It’s scampi!
Pros: Scampi!
Cons: Slightly less tender than the shell-on braise batch.
Broil
Adapted from The New York Times.
- 1 garlic clove
- 1 teaspoon kosher salt
- 1/2 teaspoon ground cayenne
- 1 tablespoon lemon juice
- 2 tablespoons olive oil
- 1 pound medium shrimp, peeled and deveined
- Turn on the broiler and put the rack close to the heat.
- Mash the garlic with the salt until it forms a paste.
- Add to it the cayenne, lemon juice, and olive oil. Rub the paste all over the shrimp.
- Lay the shrimp in a single layer on a skillet or half sheet pan. Broil, 2 to 3 minutes per side.
The broil method produced somewhat clenched shrimp. They were still delicious when hot from the oven, but as they cooled, became less appealing than the room-temp roast and sear batches. Because they cooked for so little time and didn’t include the marinade step of the roast method, the broil shrimp were also less flavorful. The garlic paste was delicious and crispy, so I might use this method again in a time crunch (i.e., if I needed to pop shrimp in my mouth ASAP before running out the door), but if I had an extra 15 minutes, I’d opt to roast instead.
Pros: Incredibly fast with minimal cleanup.
Cons: Less tender, less flavorful shrimp.
Boil
Adapted from Add a Pinch.
- 1 tablespoon kosher salt
- 1 pound large shrimp, deveined, tail and shell on
- Lemon wedges
- Add 1 quart of water and the salt to a large pot over high heat. Bring to a boil.
- Stir in the shrimp, cover, and remove the pot from heat. Let sit for 5 to 8 minutes, until all the shrimp are cooked through to a bright pink shade.
- Drain through a colander. Transfer the shrimp to a serving bowl or platter. Serve with lemon wedges.
The boil method generated super tender, almost plush shrimp that appeared overcooked at first blush — they were curled into little Os, not loose Cs — but had excellent texture. They were a bit lacking on the flavor front, since I seasoned the water with just salt, but I imagine cooking them with other shellfish, corn, and seasonings would’ve produced something delightful. The trial with shell-on shrimp made for much juicier meat than the peeled.
Pros: Shrimp pillows!
Cons: On the plain side.
Steam
Adapted from The Suburban Soapbox.
- 1 pound medium shrimp, deveined, tail and shell on
- 1/4 cup apple cider vinegar
- 2 lemons, halved
- Kosher salt
- Arrange the shrimp in a steamer basket and set aside.
- Add 2 quarts of water, the vinegar, and lemons to a large stockpot (that the steamer basket will fit on top of with a lid). Bring the water to a boil over high heat.
- Place the steamer basket in the pot, being sure the water isn’t touching the bottom of the basket. Sprinkle a few pinches of salt over the shrimp and toss to coat. Cover.
- Reduce the heat to medium and steam for 4 to 6 minutes, depending on the size. Remove the lid and toss the shrimp with tongs to ensure even cooking. Continue until the shrimp have turned pink and are opaque. The shrimp should form the shape of a C.
- Transfer the shrimp to a platter and serve.
The steam method produced extremely moist, surprisingly flavorful shrimp. The vinegar in the water wasn’t blatantly discernable, but its presence, along with the lemon, gave the meat a distinct freshness. These shrimp would be excellent chopped up and tossed with mayonnaise and fresh herbs, then piled onto buttered bread.
Pros: Silky-tender.
Cons: Less auxiliary flavorings.
/ba2619e9-c530-4599-b194-22067af45ae4--2021-1203_how-to-cook-shrimp_4x5_mj-kroeger-2.jpg)
Photo by MJ Kroeger. Prop stylist: Molly Fitzsimons. Food stylistL Lauren Lapenna.
Ceviche
Adapted from The New York Times.
- 1 pound small or bay shrimp, shelled and deveined
- Juice of 2 limes
- Juice and grated rind of 1/2 orange
- 2 ripe tomatoes, peeled, seeded, and chopped
- 1/2 cup finely chopped sweet onion
- 1 fresh mild to hot red chile, seeded and finely chopped, or to taste
- Kosher salt and red pepper flakes, to taste
- Combine the shrimp with lime juice, orange juice, and orange rind. Allow to marinate at least 2 hours, until the shrimp are opaque.
- Combine with the remaining ingredients and refrigerate until ready to serve.
I love acid-cured seafood more than most. That said, it wasn’t my favorite method for cooking shrimp, which take longer than a soft-fleshed white fish to “cook” all the way through, and already have so much flavor on their own that they don’t need as much boost from citrus as something milder might.
Pros: Delicious on a saltine or tortilla chip; a method that requires no heat source.
Cons: Takes hours!
Grill
Adapted from All Recipes.
- 1 large garlic clove
- 1 teaspoon kosher salt, plus more
- 1/2 teaspoon ground cayenne
- 2 tablespoons extra-virgin olive oil
- 2 teaspoons freshly squeezed lemon juice
- 1 pound large shrimp, deveined, shell on
- Neutral oil, for the grill
- Lemon wedges
- Heat the grill to medium.
- In a small bowl or mortar, use a fork or pestle to mash the garlic with the salt. Mix in the cayenne, then stir in the oil and lemon juice to form a paste. In a large bowl, toss the shrimp with the garlic paste until evenly coated.
- Use neutral oil to lightly grease the grill grates. Cook the shrimp for 2 to 3 minutes per side, until opaque. Transfer to a serving dish. Finish with fresh lemon juice and salt.
Grilling lends any protein a smoky flavor, and shrimp is no exception. I tested with both shell-on and peeled, and the former produced much juicier, tender shrimp. I found that grilling peeled shrimp led to drier specimens, with less consistent interior texture.
Pros: A smokier flavor that would suit “surf and turf” better than the other methods.
Cons: Unless you use a grill basket, it’s pretty easy to lose the little guys between the grates!
The Absolute Best Ways To Cook Shrimp
- For speedy shrimp with the best texture and flavor, roast
- For buttery, tender shrimp that beckon a baguette, simmer
- For near-silky, gently flavored shrimp, steam
- For a big batch of shrimp to pair with an exciting side and/or sauce, boil
- For saucy, spicy shrimp that won’t dry out, braise
- For the crispiest, juiciest boys, fry
