Bone broth has been having a bit of a moment. Lauded for its jiggly-when-cold, collagen-rich liquid (which is relatively low in calories, high in protein, and supposedly promotes skin, hair, and nail growth) and compatibility with fat- and protein-centric (and carb-avoidant) diets, bone broth has even been a way for curious eaters to practice environmentally conscious cooking. If our food is indeed only as good as the food it eats, then throwing bones fed by grass; local, still-gritty carrots and onions; and tap water into a large pot, means concentrated good — for you, for the community, and for planet — right?
What’s the difference between broth and stock?
Although bone broth has enjoyed recent trendiness, it’s been around for a long, long time — just not by the same name. While “stock” is traditionally made from animal bones, and consequently has a richer flavor and texture, “broth” is typically made from meat, and so, yields a clearer, more subtle-tasting liquid. Ingredients for stocks are also usually roasted until they take on a bit of color (color = flavor), while broth ingredients are added in raw. “Bone broth,” then, is a bit of a misnomer; we’ve come to expect the deep-dark, viscous, collagen-richness of a stock, but enjoy the cozy, tea-like connotations of broth.
Bones are bones are bones . . . right?
Alright, so if we’re after a broth stock made of bones, can’t we just toss in…bones? Well, yes. And no. Not all beef bones were created equal.
Femur bones, which are typically split lengthwise, roasted, and spooned, are the longest bones in a cow’s body, and filled with marrow. Because marrow is largely fat, save center-cut bones for roasting and topping toast. We’re after the knuckle boneslocated at the cow’s leg joints. These bones have enough marrow to contribute collagen-rich gelatin to our broth, but not so much as to make the broth unduly heavy.
Rib and tail bones (short ribs and “oxtail”) are sold meatier than center-cut marrow and knuckle bones. They are great options for supplementing, or replacing knuckle bones, as they contain similar amounts of collagen, but with less fat.
Whether you’re able to scrounge together four pounds of knuckle bones, or a combination of knuckle, rib, and tail, make sure the bones you’re buying are organic (grass-fed is a plus). As what you’re doing is basically cooking bones until they’re soft and eating them, this is a time when quality matters quite a bit.
Lastly, you need not use all — or only — beef bones. Feel free to substitute pork and lamb “knuckles” or chicken carcasses. Chicken feet, especially, will add a significant amount of gelatin to your broth.
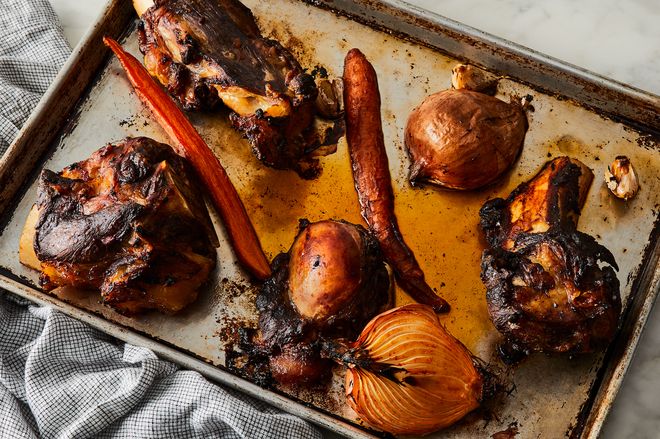
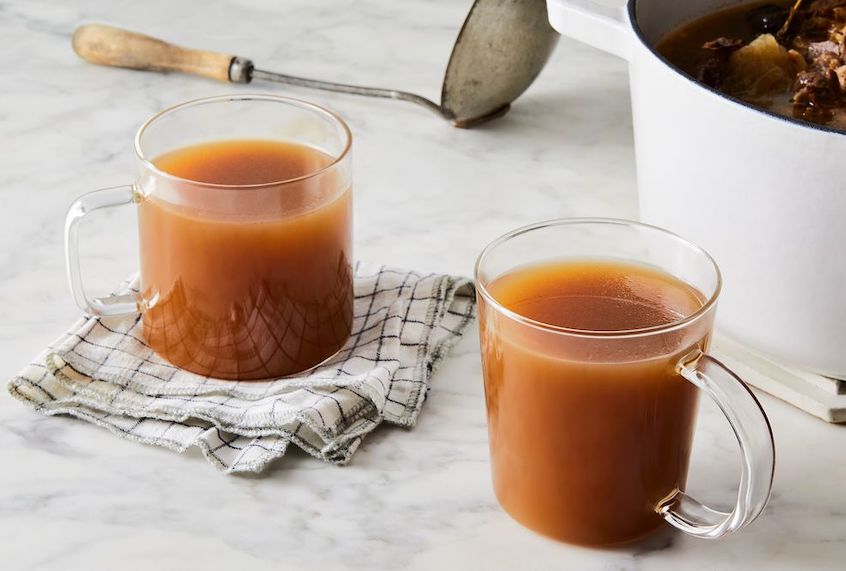
Photo by Rocky Luten. Food stylist: Drew Aichele. Prop stylist: Brooke Deonarine.
Aromatics
This is largely a matter of personal preference. A traditional stock will often include carrot, onion, celery, parsley, thyme, and bay leaves. Feel free to add all that, or whatever you find in the fridge: half a leek, a fridge-softened parsnip, and frizzled-out herbs will all work very well here. All will provide your savory broth with a much-needed natural, vegetal sweetness.
In the first round of development of Our Best Bone Broth, high on my broth-purist horse, I dreamed up a recipe that required just roasted bones and water. I thought, when roasted, grass-fed marrow can be so good, so why would the broth need anything else? Of this version, my recipe taster partner said, “This tastes like Domino’s.” So, for a broth that tastes a bit more complex than liquidized, synthetic cheese, you have to add aromatics, i.e. vegetables.
As mentioned above, roasting gives the final stock a deeper color and flavor. Instead of plopping tomato paste in along with the water, as many recipes call for (this has always been a mystery to me, as caramelized tomato paste is hugely superior to raw, but I digress), I whisk it with oil to coat and roast the vegetables and bones. Also, vegetable peels = flavor, so don’t waste your time peeling anything you don’t have to.
Pressure cooker vs. slow cooker vs. stovetop
I personally don’t own a pressure cooker, and generally distrust any recipe or method that requires the use of a specific appliance. But this is one of those recipes where the appliance in question significantly cuts down on cook time, and makes for a significantly superior end product.
Pressure Cooker. After cooking for two and a half hours on High pressure, the bones had mostly done their job — the surrounding cartilage had begun to turn soft, but the bones themselves had not yet started to break down. Bones breaking down is a good indication that the broth will be fully flavored and fully gelatin-rich. After another one and a half hours at High pressure, the cartilage had completely broken down, and finally, sections of bones had grown soft. Given the large (read: maximum) volume of beefy, fatty liquid in the pot, it’s best to let the pressure cooker depressurize on its own (I did this manually the first time and got hot bone broth all over my countertop and walls).
Slow Cooker. A slow cooker, unfortunately, will not get to a high enough temperature to break bones down properly, nor will its use reduce the cook time in any real way. Might as well, then, in my opinion, do it on the stovetop.
Stovetop. While not impossible, it took the stovetop version 16 hours to get to that same bone-melty place. I’m not totally keen on leaving the stove on for that long (overnight especially). But, if you’re planning on being in or around the house all day, and enjoy the smell of Beef! in the air, the stovetop method works the best.
Storage
Let the stock cool slightly before fine-straining and transferring to smaller, airtight containers. I love quart containers or Mason jars, as they’re easy to label, store, and retrieve from the freezer as I need them. If using glass containers, do leave at leastone and a half inches of headspace while filling them. Liquids expand as they freeze and will break your jars (I’ve broken at least five jars this way). After just a few hours in the fridge, the stock should completely solidify, and you can easily peel off the “puck” of fat that’s risen to the top. Don’t discard this! Store the rendered beef fat (tallow) in a jar, and use it to roast wintry root vegetables, toast slices of bread, or crisp smashed potatoes.
Best Bone Broth
Prep time: 2 hours 10 minutes
Cook time: 4 hour 20 minutes
Makes: 2-3 quarts, depending on the method
Ingredients
4 tablespoons extra-virgin olive oil
1 tablespoon tomato paste
4 pounds mixed beef bones (such as marrow, short rib, and knuckle), split and cut to 6-inch lengths
1 medium yellow onion, unpeeled and halved
1 medium carrot, scrubbed
3 sprigs thyme
1/2 bunch flat-leaf parsley
1 tablespoon whole black peppercorns
2 dried bay leaves
1 tablespoon salt, plus more as needed
Directions
1. Heat the oven to 450°F. Whisk the oil and tomato paste in a large mixing bowl. Add the bones, onion halves, and carrot, and toss to coat. Roast for 20 minutes, flipping halfway, or until everything’s taken on a bit of color. Depending on your preferred method, head to step 2 or 3.
2. *Instant Pot (or pressure cooker) method:* Transfer the bones, onion, and carrot to a pressure cooker, and add enough water to reach the Max line. Float in the herbs and spices, and cook on High pressure for 4 hours. Let cooker depressurize on its own, then proceed to step 4.
3. *Stovetop method:* Transfer the bones, onion, and carrot to a large stockpot, and fill with enough water to just barely cover the ingredients. Float in herbs and spices, and bring to a boil. Reduce heat to low, and cook at a gentle simmer, adjusting the heat as needed, for at least 16 and up to 24 hours.
4. Season the stock to taste with salt, and let cool until warmish. When cool enough to handle, pour through a fine-mesh strainer into airtight containers (you should have about 3 quarts from the pressure cooker method, 2 quarts from the stovetop). Chill in the fridge for at least 2 hours, or until the stock is jellified and fat has formed a solid lid. Spoon off the fat, and reserve it for another use (like roasting vegetables, toasting bread, or frying potatoes).
