Can You Dig It is a new monthly series by Kristin Guy in which a real-life garden DIY is tackled with real style. Whether you’ve got an expansive outdoor plot or just a few houseplants, Kristin will inspire you to grow even more with easy-to-tackle projects and horticultural know-how.
Confession time: I love brooms. Specifically, tiny handmade brooms. In fact, if you peeped into my greenhouse, you’d find not one, but four handcrafted brooms hanging on my workbench. There’s something special about the care and detail spent on an object most find utilitarian. I like to think of it as an extension of my horticultural work — a beautiful object that plays an important part of my routine, and turns an ordinary act (in this case, cleaning) into an extraordinary celebration of completion.
Perhaps I just love tools in general. After all, accouterments are the most important part of the creative process . . . right? So, what better way to celebrate these objects than to learn how they are made.
First things first, what are brooms even made from? Turns out “broomcorn” is a thing — in fact, a type of millet (Sorghum bicolor for my fellow latin-loving plant friends). When I first learned that, my nerdy garden brain immediately wanted to figure out how to grow it myself. Side note: You can, and apparently pretty easily. Luckily for us, this ready-to-use material is also widely available at most craft outlets, so there’s no seed-sowing or harvesting required. All it then takes is a quick DIY to turn it into a beautiful, and very useful, garden broom.
For our foray into broom-making, we’re keeping things simple by looking to one of my favorite gardening go-tos for inspiration: the whisk broom. It’s the perfect petite broom to tackle any house-plant potting spills, seed-starting soil drops, or even just to dust corners and cobwebs. Simple yet stylish, I encourage you to make this duster your own by experimenting with different color combinations of twine and bristles. You can make it as minimalist or as eclectic as you want.
/6c088de0-3c21-4fb8-9d13-f2be4a0d54fa--01_whisk_broom_materials_kristin_guy.jpg)
Photo by Kristin Guy
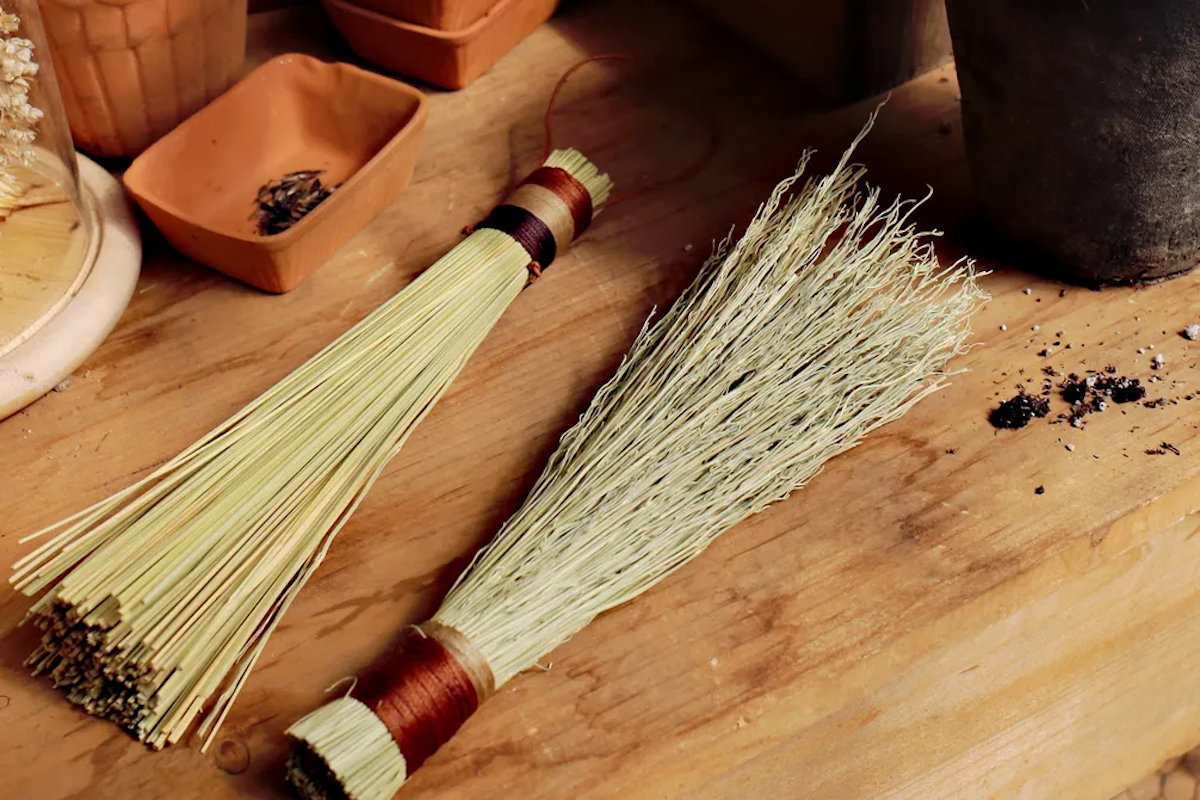
Broomcorn’s natural texture also gives you the opportunity to create two looks within one fiber bundle, depending on which end you use for your bristles (one end is straight and tidy while the other is more rustic and raw). For this DIY, we’re making the most of our materials, and whipping up two styles of whisk brooms: one for sweeping away finer material, and the other for heftier tasks. Two brooms for the price of one, you say? Yep — that’s my kind of DIY.
Once you’ve mastered this simple whisk broom, consider learning some more decorative techniques like the Hawk Tail, Hens Wing..or even the Twisted Turkey. I am not making these names up people! There’s an incredible world of fiber arts out there ready for you to discover.
DIY Whisk Broom
Makes: Two 9-Inch Hand Brooms
MATERIALS:
- 20″ Craft broomcorn (natural and dyed available)
- Wax coated hemp twine (swap: nylon twine, coated wire, leather, basket reed)
- Scissors
- Garden Shears
- Large Tapestry Needle
- Leather Cord (swap: twine, ribbon, wire)
/f6f1cbfe-2650-46a6-ac58-b5355a2b6cd0--Screen_Shot_2022-04-28_at_11.11.03_AM.png)
DIRECTIONS:
Note: Broomcorn is available by the pound, for each of these smaller hand brooms we’re using approx 1/4 pound (one large handful) but you can adjust thickness to suit your needs.
Step 1: Bundle a large handful of broomcorn in your fist, making sure that the flat cut ends are flush.
Step 2: Cut the bundle in half and set aside one portion for your second broom.
/b82d2f36-32a3-424d-a4a5-8a59b78a504e--Screen_Shot_2022-04-28_at_11.12.11_AM.png)
Step 3: Holding your 10-inch bundle, create a clove hitch knot to secure twine before winding the handle.
Step 4: Tuck the starting end of your twine inside broomcorn before winding the rest of your twine to keep it from tangling.
Step 5: Wind twine around the broomcorn bunch several times to achieve desired thickness, tightness is key as it can loosen over time. If you think it’s tight enough, go back and make it even tighter (trust me).
/e151983e-efa8-4fb4-ad7b-4904910895b1--Screen_Shot_2022-04-28_at_11.24.03_AM.png)
Step 6: Thread the end of your twine back through the underside of your wrapped handle, pulling the end all the way to the top, double knotting with your starting end.
Step 7: Tuck knot underneath twine wrapping to further secure in place.
/c4599976-8502-4857-9bc0-49c28def7463--Screen_Shot_2022-04-28_at_11.25.24_AM.png)
Step 8: If wrapping more than one color for your handle, repeat steps above for each row of colored twine.
Step 9: Once you’ve completed your handle, trim the top of the broom handle with sharp garden shears, and clean up the bottom of the broom to your desired shape using scissors.
Step 10: Repeat steps 1-9 for the second broom, using your other half of the broomcorn bundle.
Step 11: To add a handle for hanging, knot one end of the leather cord and pull through one side of the twine handle weaving.
/3dca3c71-f189-45fa-bc42-c1e6a93cb037--Screen_Shot_2022-04-28_at_11.31.37_AM.png)
Step 12: Loop cord to its desired length over the top end of the broom and then thread once more down through the opposite side of the handle wrapping underneath the twine.
Step 13: Secure the end with an additional knot . . . and we’re done!
This post contains products independently chosen (and loved) by Food52 editors and writers. Food52 earns an affiliate commission on qualifying purchases of the products we link to.
