2020 was the year the peanut peaked.
Each American consumed, on average, 7.6 pounds of peanuts — an all-time high. This per the USDA, the U.S. Census, and, delightfully, the National Peanut Board. Of that 7.6 pounds per person, roughly 56% was ingested as peanut butter. I am willing to believe this part, as I once attempted to scoop out the Skippy from the inside of a dog’s bone.
While they may be Miss Popular in America’s Top Snack to Eat on a Domestic Flight, peanuts got their start far afield. The legumes are thought to have originated in South America some 10,000 years ago. After Spanish colonizers hefted peanuts back across the Atlantic by the bushel, they brought them to the Philippines — and meanwhile, the Portuguese brought them to Goa — spurring their proliferation to China and Indonesia. Peanuts traveled to Africa as a commodity exchanged by the Portuguese for spices and ivory, and from Africa to the United States through the slave trade. Up until the Civil War, peanuts were largely a regional staple in the American South. Circus peanutsand peanut butter both emerged commercially in the late 19th Century, and the groundnuts have since been a staple in the culinary realm and beyond, with significant credit due to George Washington Carver, who invented hundreds of products made from the little guys. Corporations like Conagra and Procter & Gamble joined the commercial butter fray soon after.
Which brings us — sort of, kind of — to 2020, the year of the peanut.
There was, accordingly, no more obvious contender for my last Absolute Best Test of the year than PB, which was convenient given our SEO strategist basically insisted upon it. Behold, the results of my day spent with so many peanuts, when the grocery store employee who checked me out asked if everything was “going okay.”
Controls & fine print
For each test, I used 2 cups of unsalted roasted peanuts, 2 scant tablespoons of peanut oil, 1 tablespoon of honey, and a heaping 1/2 teaspoon of kosher salt. A highly biased taste-tester who also identifies as my dad described this ratio as “delicious” and “just like candy.”
If you prefer to buy peanuts raw and roast them at home, simply pat yourself on the back because you’ve got your life together in a big way, then proceed to roast on a rimmed baking sheet at 350°F for 10 to 15 minutes, until they’re fragrant and golden with oil beginning to brim on their surface.
* * *
Methods & findings
High-powered blender
Method
- Add the peanuts and blend, covered, on medium-high for about a minute, until they’re broken into pieces the size of coarse grains of salt.
- Scrape down the sides with a spatula, cover, and continue to blend until the peanuts look damp and matted.
- Scrape down the sides, add the oil, honey, and salt, and blend on high until the desired texture is achieved, another minute or two. If needed, pause to scrape down the sides intermittently.
- Store covered at room temperature for up to a week.
(Note: I suspect standard blender butter would be a bit chunkier naturally—I plan to test and report back for a round two.)
Findings
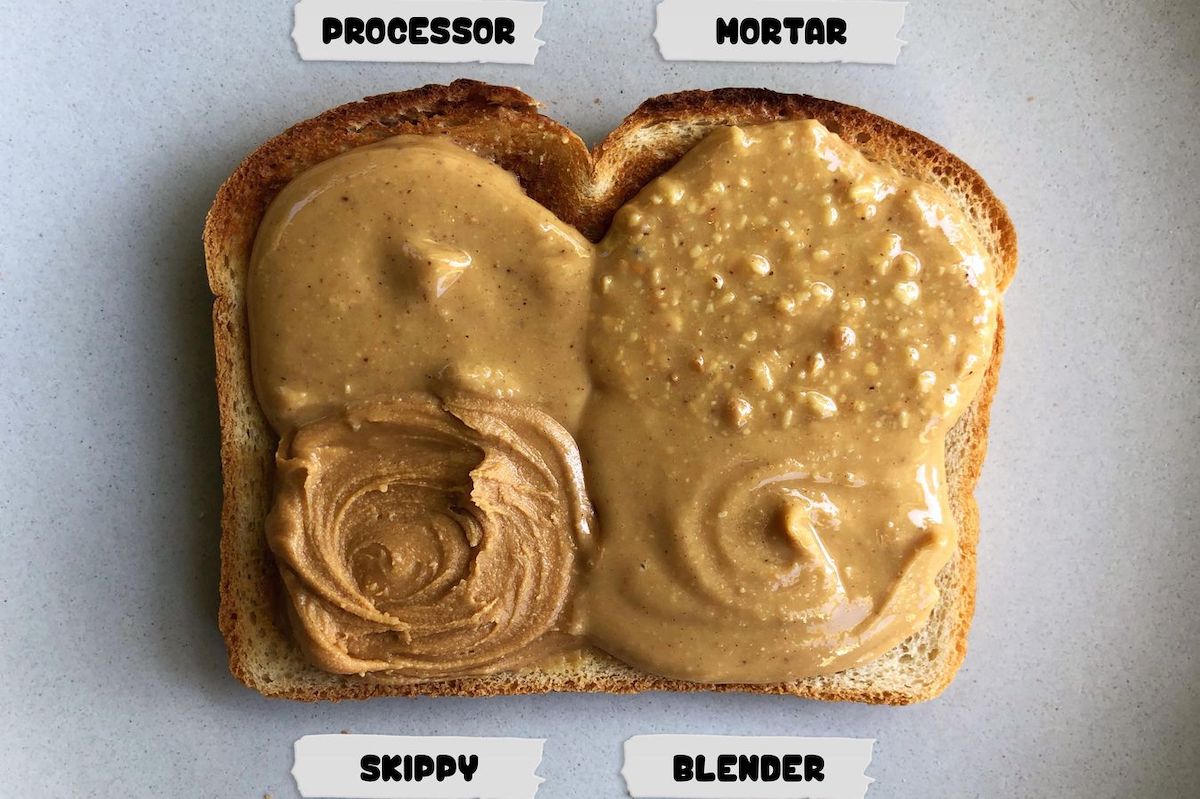
Every time I use a borrowed Vitamix — I refuse to shell out — I am floored by its sheer power. There’s always a moment about 30 seconds into blending during which the motor kicks into high gear and it sounds like my kitchen might explode. It was at this precise juncture that my peanuts began to turn from plain old roasted nuts into nut pieces closer in texture to Parmesan dismantled by the finest side of the box grater. A few minutes and side-scrapings later, they morphed into something wetter, more matted, almost like crumbly biscuit dough. At that point, I added the oil, honey, and salt and “let her rip,” as they say in the Vitamix community.
The result was a peanut butter so creamy, so smooth, so glossy, it could’ve graced the cover of any magazine (or slice of toast). While it had a touch more texture than store-bought PB, it lacked the coagulated stickiness, in the best possible way. I would be pleased to drizzle blender peanut butter over any yogurt or granola bowl, turn it into sauce and pour it over rice, or incorporate it into my next round of baked tofu. Chunky butter lovers may want to reserve half of the peanuts to add along with the oil and honey, for more texture.
Food processor
Method
- Add the peanuts to the bowl of a food processor fitted with the S-blade. Process for a few minutes, until the peanuts are broken into pieces the size of coarse grains of salt.
- Scrape down the sides with a spatula, cover, and continue to process until the peanuts look damp and matted.
- Scrape down the sides, add the oil, honey, and salt, and process until the desired texture is achieved, another few minutes. If needed, pause to scrape down the sides intermittently.
- Store covered at room temperature for up to a week.
Findings
As I’ve mentioned before in Absolute Best Tests, the food processor is the most-used appliance in my kitchen. That said, it can be hit or miss in the realm of plant-based butters and milks. (This is a passive-aggressive reference to my old Cuisinart specifically, which shuddered to a full stop the last time I attempted coconut butter within its mighty plastic bowels.)
So I was surprised when the process of alchemizing roasted peanuts into silky butter with a food processor turned out to be extremely simple. The method mimicked that of the Vitamix, except with only one “blend” setting in the case of the processor, and the resultant PB was nearly indistinguishable. If pressed in, say, a Court of Peanut Butter, one might admit that food processor peanut butter is a hair grittier than blender butter, but it’s otherwise nearly identical. As with the blender method, consider adding half of your peanuts midway through if you prefer a spread with more texture.
Mortar & pestle & mixer
Method
- Grind the peanuts in a mortar with a pestle until you’ve achieved a homogeneous paste. (Note: If you’re going for something chunkier, stop while you’ve still got plenty of small, visible peanut shards.) For me, this took about 25 minutes for 2 cups of peanuts.
- Transfer the paste to a large bowl or the bowl of a stand mixer. Add the oil, honey, and salt. Mix for roughly 10 minutes on medium-high until you’ve achieved a creamy emulsion that doesn’t settle into separate layers when you stop for a few minutes.
- Store covered at room temperature for up to a week.
Findings
Oh my good god. This peanut butter made my mouth feel how I imagine feet feel when slipped into silk slippers. (No wonder when I realized that the method was adapted for Bon Appétit by my former Food52 colleague Joanna Sciarrino, one of my nut butter and general sauce/spread idols.) Perhaps due to my subpar pestle skills, my peanut butter retained more texture than either the blender or processor butters. This was a feature and not a bug. This method also affords more control over the exact crunchiness level of your final product, both because you can stop pounding whenever and because you can toss in more peanuts at various points for lots of textural variety, if you please. The mortar and pestle PB was also stickier and thicker than either of the motorized batches.
* * *
TL;DR
Make peanut butter any way you please, and it’ll be delicious.
For a crunchy-silky texture, call upon your mortar and pestle plus hand mixer. For the smoothest, least-gritty stuff, break out a high-powered blender. If you don’t have one, use a food processor for nearly identical PB.
